The WooCommerce Products Wizard - Composite product builder plugin adds an augmented value to your e-shop by offering your customers a flexible and easy-to-use method to navigate in your store and buy a variety of products separately or in a composite kit.
If you sell products:
which consist of many parts, such as computers, bicycles, drones, skateboards, pizzas..., and you do not want your customers to be confused on what to buy or you do not want them to forget parts they need for a complete working product...
which can be combined with others, such as clothes, gift-boxes..., and you wish to inspire your customers on what to choose...
which have a unique appearance, such as T-Shirts, cups, pillows..., and you want your customers select their color, size, stamp, stamp position, and size...
which you do not have in stock, such as handmade jewels, shoes..., and you want your customers to build their own custom-made, unique, personalized products...
then the WooCommerce Products Wizard - Composite product builder plugin is for you!
Actually the WooCommerce Products Wizard - Composite product builder plugin creates a wizard that guides your customers step by step in your store offering:
Many combined sources to fetch products on each step;
A great number of layouts and views, each of them totally configurable, to present your products;
Many options on pricing the products, such as mass discounts;
The ability to configure conditionally which steps of the wizard will be visible to your customers, depending on the selections they already made in previous steps;
Moreover, the WooCommerce Products Wizard - Composite product builder plugin creates a PDF file of your customers' selections and send it to them via email instead of the usual checkout workflow.
You can create as many wizards as you wish in your store - each of them with its own settings.
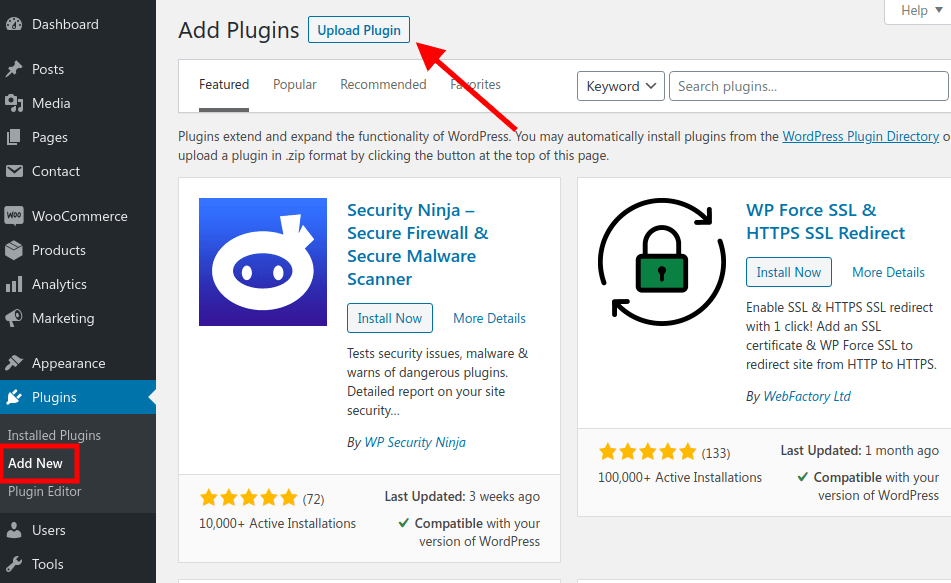
Download the plugin's zip file. From the dashboard of your site click the Plugins - Add New option.
Click the «Upload Plugin» button on the top.
Select the downloaded zip file, upload it and click the «Activate» button.
If you haven't already installed or activated the WooCommerce plugin, you will see a notice. The WooCommerce plugin is required for the WooCommerce Products Wizard plugin to work.
Creating a Wizard
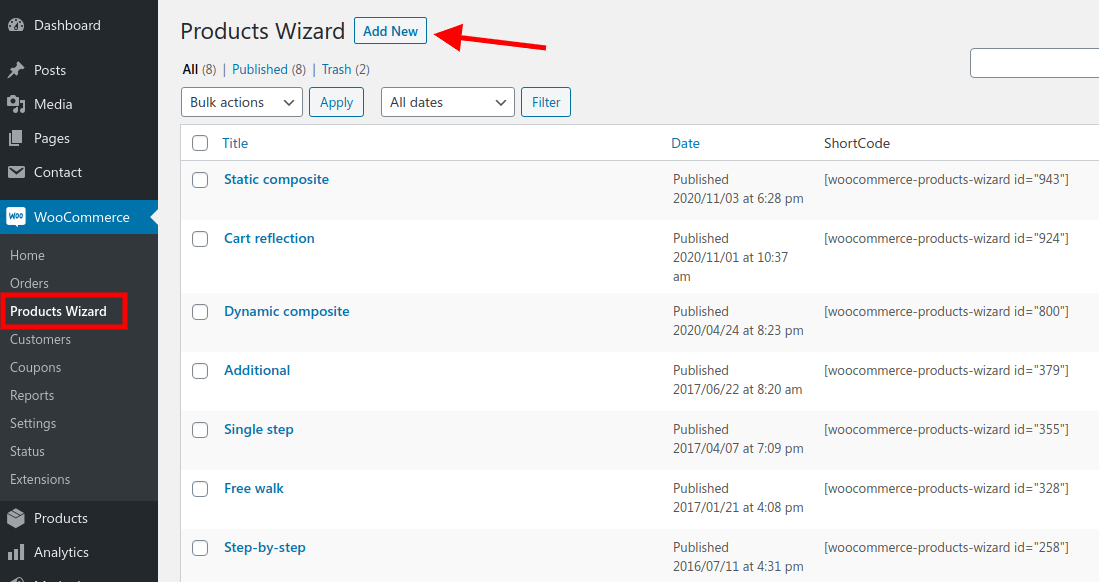
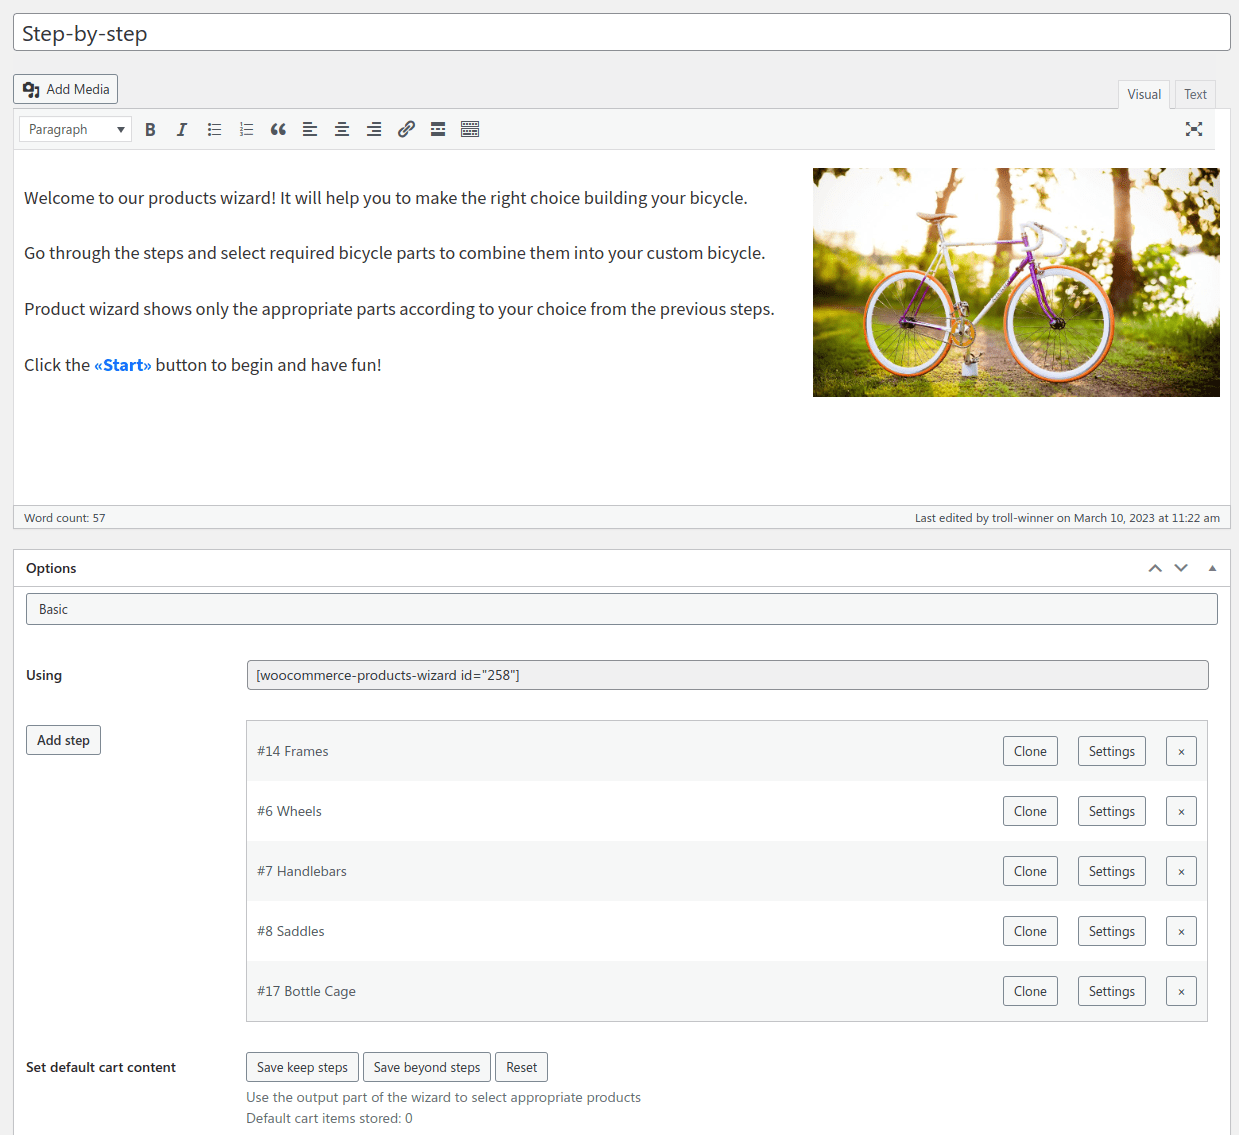
To create a new wizard go to the «WooCommerce - Products Wizard» page and click the «Add New» button.
Type a name - better relevant to the scope of your wizard.
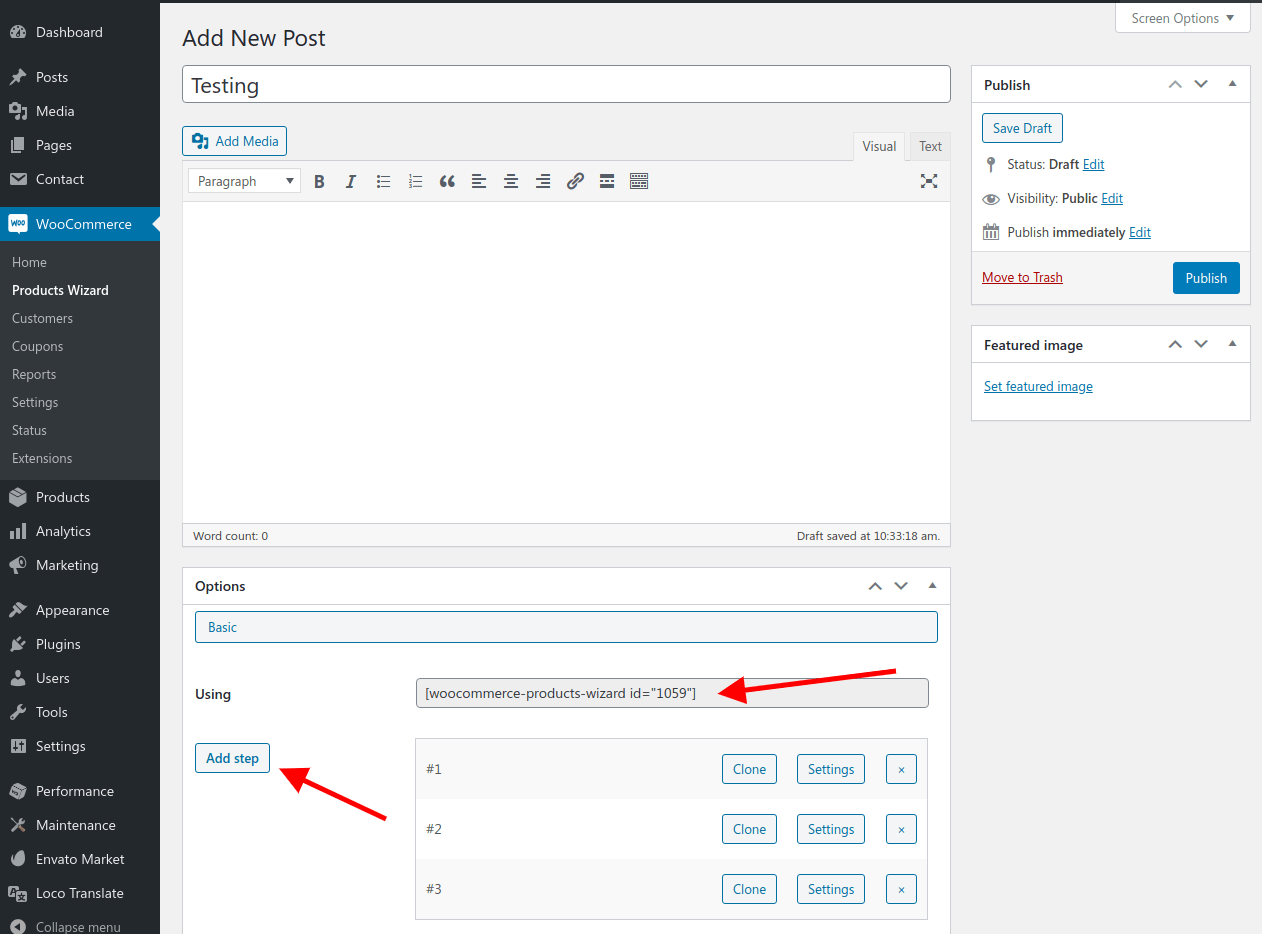
The content part can be used as a welcome step for your wizard. You can add here, for example, a description of what your customers get from this wizard.
Click the «Add step» button to create some steps. Save the wizard.
Use the Wizard
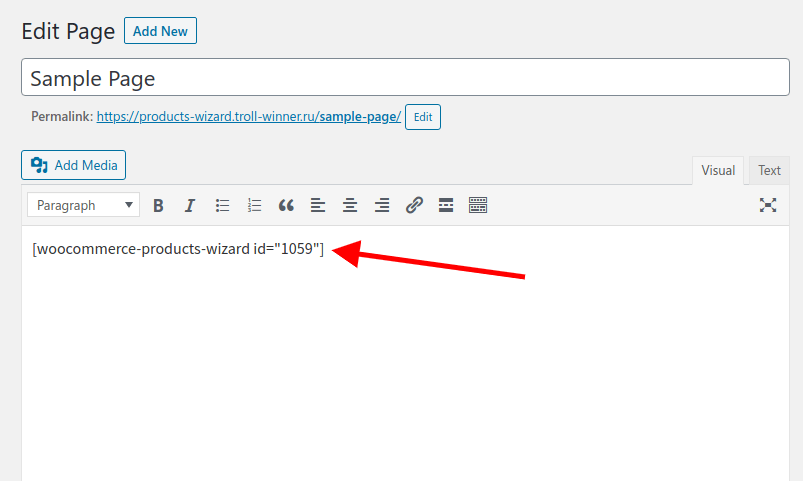
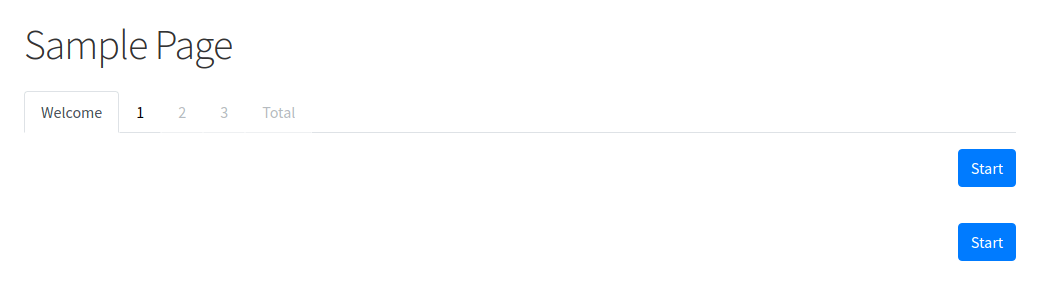
Copy the shortcode of the wizard and paste it on any page or post you want.
By previewing the post/page, you will see the steps you just created, as in the image below.
Now you are ready to fill the steps' options.
Wizard Settings
In each wizard, there are the following sections: Steps, Behavior, Cart, Kit, Thumbnail, Layout - General settings, Steps - General settings, Strings - General settings, Control buttons' settings, Result, and Filter.
Changes in the settings of a wizard affect only the current one.
There are predefined values in the settings of each section.
The functionality of each section in short:
In the Steps section you create the steps of the wizard that guide the end-user. In each of these steps you define the rules that fetch the products you want, along with the rules that hide/show the current step, depending on the product selections the end-user made on previous steps.
In the Behavior - General setting section you define the format the steps of the wizard are presented, e.g. in a single line, in tabs, in chronological line, etc.
In the Cart - General setting section you configure the general interaction of the products of each step with the cart. The settings of this block are inherited in each step of the wizard. In each step though you can define its own settings for the Cart setting and overlap these general ones.
In the Price section you define some global settings for pricing and discounts.
In the Thumbnail section you configure the settings of the canvas used to show the different phases (images) of the composite product as the customer selects the parts it is combined.
In the Layout - General settings section you define the global settings of the layout of each step. For example, the products can be presented in tabular mode, grid mode, etc. In each step, though, you can define its own Layout settings.
In the Steps - General setting section you define some global settings for the steps of the wizard, such as if the first (Welcome) / last (final product) step is shown. You also define the labels of the fields in the wizard. In this section also you can define a contact-form that cooperates with the wizard.
In the Strings - General settings section the labels of the fields the end-user sees, are defined.
In the PDF Settings section you define many formatting options for the exported PDF file with your customers' selection.
In the Control buttons' settings section you configure the appearance and the labels of the control buttons, namely: Start/Back/To the cart/Reset, etc.
In the Filter - General settings section you define the global settings of the filters of each step and the labels of their fields. In each step though you can define its own settings for the Filter setting.
In the following paragraphs each of these settings is presented in detail.
Basic Settings
In this section you create the steps of the wizard, along with the rules of each individual step. You can also change the order of the steps by drag and drop.
To create a new step just click the «Add step» button.
By using the «Set the default cart content from your session» option you can create a wizard which contains a predefined set of products as soon as the wizard starts. This option can be used after you finished your wizard and added to it its final functionality.
Run your wizard and walk through it. In each step add the products you want from this step. When you finish, click the «Save keep steps» button if you want to allow your customers to change the pre-defined products.
Click «Save beyond steps» button if you want to make the pre-defined products fixed in the wizard and can't be removed from the selection.
Then, each time you lunch the wizard, these products will be shown in each step by using the default navigation (i.e. by just clicking the Next Button). This setting might be helpful in case you want to promote several products from your store.
To reset this selection click the «Reset default cart» button.
Step Settings
By clicking the «Setting» button of each step, you can define the settings for this specific step. If you do not specify any settings in a step, then the predefined settings of the wizard are applied.
The options you can set in the Settings section of each step come in several groups.
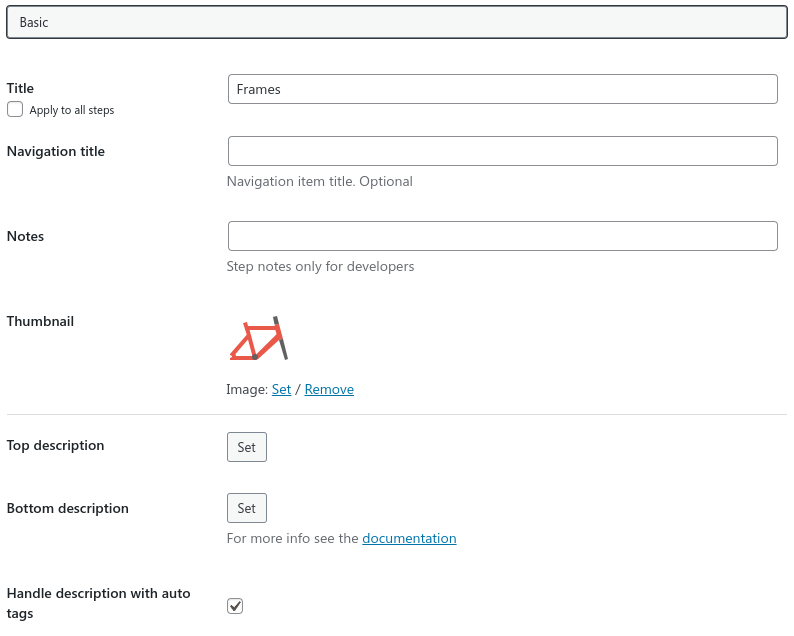
Basic Group
The «Title» option defines the title of the step.
The «Navigation title» can be different from the step title itself.
The «Navigation subtitle» allows to output additional navigation text.
The «Thumbnail» option defines a thumbnail which is shown in the navigation tab of the step. This works only with the Step-by-Step behavior.
In the «Top and bottom description» areas you can add a text for your customers before and after the products' area of this step.
In the description area you can also add custom fields to collect extra data from your customers using the special shortcode, as [wcpw-step-input name="My custom filed"].
It allows to create such inputs as text, checkbox, radio, text area, select, file, and so on.
The «Handle description with auto tags» option preserves the HTML-tags in the text and shows the text HTML-formatted.
That's also possible to Merge the step with the previous one if it's exist to output the steps on a single tab at once.
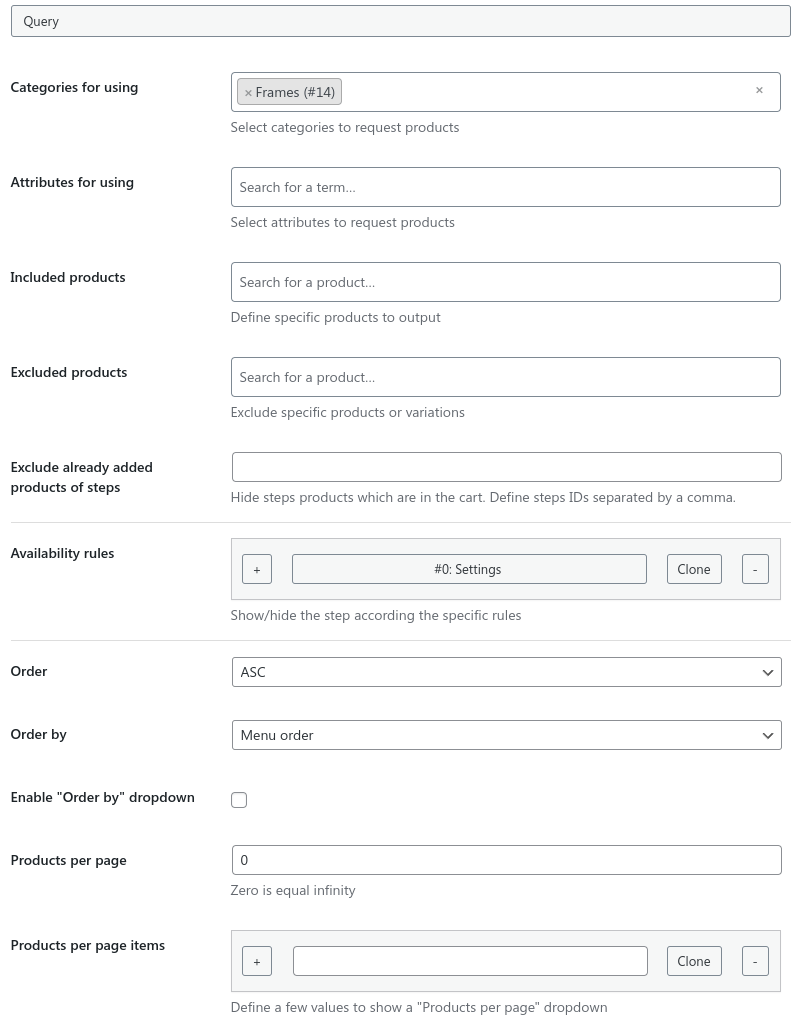
Query Group
This is the part of the step that fetches products for this step. There are many sources to use: Product Categories/Product attributes/(Included/Excluded) Individual products.
«Maximum products number» setting allows to limit how many products will be visible for the step.
«Hide if have no products» setting will hide and skip the step if it has no products to show. That might be helpful in case of the outer filters applied.
In the «Categories» settings, select the categories of the products you want to present in this step.
In the «Attributes» setting, use product attribute values to fetch products. By using a combination of these 2 options you can better filter the products you present in this step.
The «Included products» setting allows you to fetch the specific products you define here.
Mind that this setting overwrites the «Categories» setting, because the products of this step must fulfill both conditions: they have to be in the selected category AND in the included products.
If you leave both the above settings empty, then a blank step, containing only the description and the custom fields you possibly added, will be shown to the customer.
The «Excluded products» setting allows you to remove from this step the products you type here. They are excluded from the products fetched either by the Category / Attributes / Included product setting.
The «Order» and «Order by» options define the sorting order of the products. A number of options are available in the Order by setting: ID, Name, Author, Date, Modified, Rand, Comment count, Menu order, Included products, Price.
The «Enable 'Order by' dropdown» option shows the typical WooCommerce dropdown menu for the products' order.
The «Products per page» option defines the number of products shown on a page. This setting creates a dropdown box in which your customer can select the number of products he wants to see in on single page. To create the values of the dropdown box use the + button to add different lines, each one for a single value of the dropdown box, and type a numeric value in each line.
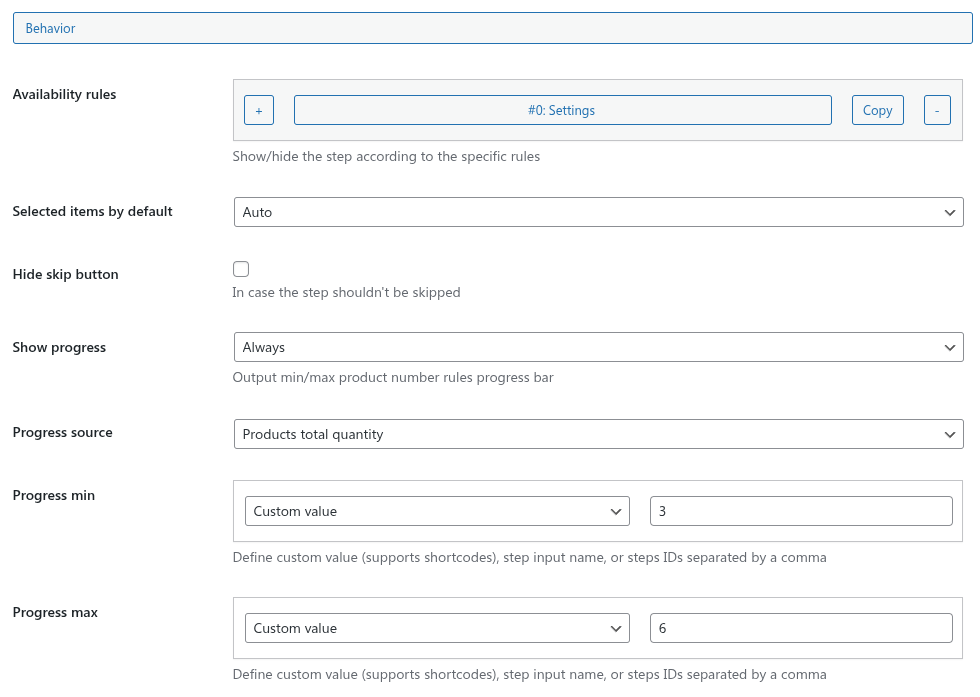
Behavior Group
«Availability rules» is a unified setting to control item appearance. See description.
The «Selected items by default» setting defines the products that are selected by default when entering this step. However, it isn't mean the product immediately will be in the cart - only choose elements will be pre-checked. Available values are:
«Auto» - the first available product will be selected;
«All» - all products will be selected;
«Custom» - custom selected products or variations will be selected;
«None» - no products will be selected.
«Hide skip button» setting can help in case you want to make this step can't be skipped.
This is possible to output the Progress element reflecting minimal, maximal, and the current value of:
«Products selected» - how many products are selected despite their individual quantity;
«Products total quantity» - how many products are selected including their individual quantity.
Min and Max values can be:
«Simple count» - type a static value. Counts the number of products selected in this step;
«Count the selected products of the steps» - count of selected products from the other specific steps;
«Least product quantity of the steps» - the smallest quantity value from the other specific steps' products;
«Greatest product quantity of the steps» - the greatest quantity value from the other specific steps' products;
«Sum of products' quantities of the steps» - the sum of the quantity values from the other specific steps' products;
«Step input value» - allows to use a [wcpw-step-input]
shortcode numeric value given by the customer.
To use other steps' products, in the option's value, type the IDs of the desired steps separated by a comma. These IDs can be found in the "Steps" settings group, before the titles of the steps list.
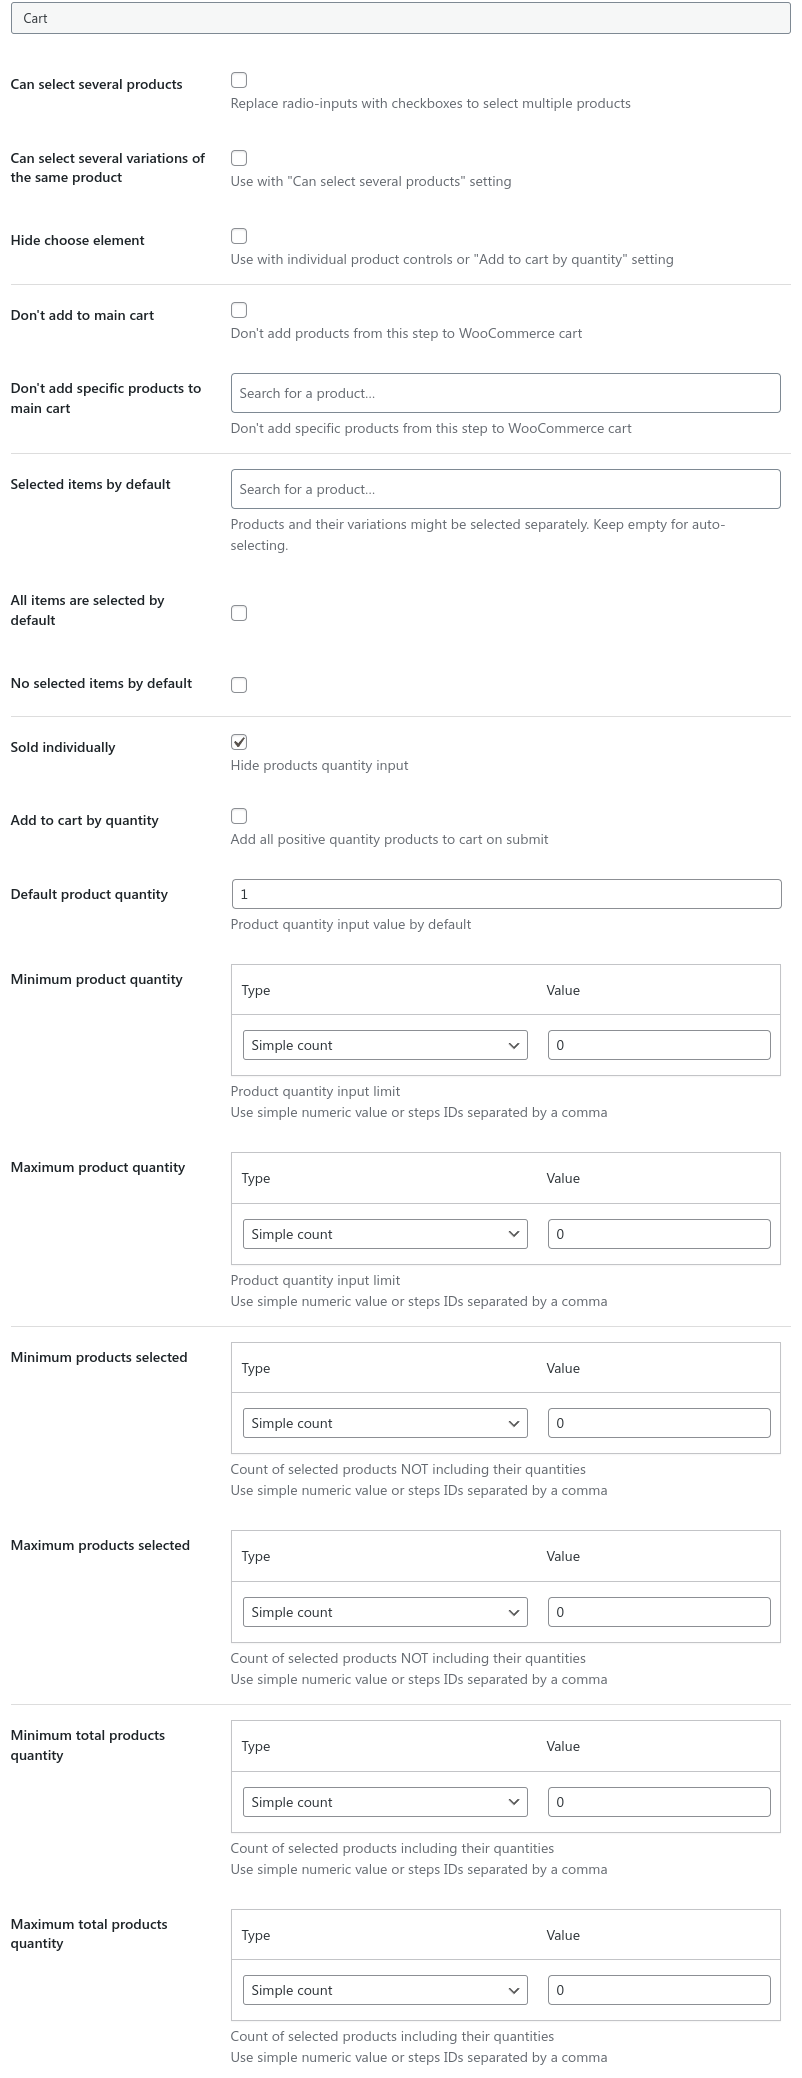
Cart Group
The «Select multiple products» option allows your customers to select more than one product in this step. If this option is checked, the radio buttons of the products are replaced by checkboxes.
The «Select multiple variations per product» option changes the variable product's behavior. In conjunction with the "Can select multiple products" option it doesn't replace another variation of the same product while adding it to the cart.
The «Hide the product selection icon» option hides the radio/checkbox icon on each product. If you enable this option, then the only way to select a product is the use of the individual controls of each product.
The «Submit on choose» setting makes the products be added into the cart on choosing a product. This request will be as much not-blocking as possible.
The «Add to cart behavior» option defines the action that is fired after a product is added to the cart. It can stay on the same step, go next step, or add to the main cart immediately.
The «Don't add to main cart» option does not allow any product of this step to be to the cart.
The «Don't add specific products to cart» option excludes the products you specify from the cart. The products will be visible in the wizard, but they could not be added to the cart.
The «Sold individually» option shows/hides the quantity setting input of a product.
The «Add to cart by quantity» option is also available. When this option is set, then all products having a quantity more than zero are added to the cart. When this option is selected the product selection icon is hidden. The products' quantity is still visible. The «Sold individually» setting shouldn't be enabled if this option is checked.
The «Default product quantity» option sets the initial products' quantity for this step. This option works with the «Sold individually» option. When the customer enters this step, and the «Sold individually» option is enabled, the product quantity defined here will be set to each product of the step.
The «Minimum product quantity» option sets the minimum product quantity input value for this step. This option works without the «Sold individually» option.
The «Maximum product quantity» option sets the maximum product quantity input value for this step. This option works without the «Sold individually» option.
Min and Max values can be:
«Simple count» - type a static value. Counts the number of products selected in this step;
«Count the selected products of the steps» - count of selected products from the other specific steps;
«Least product quantity of the steps» - the smallest quantity value from the other specific steps' products;
«Greatest product quantity of the steps» - the greatest quantity value from the other specific steps' products;
«Sum of products' quantities of the steps» - the sum of the quantity values from the other specific steps' products;
«Step input value» - allows to use a [wcpw-step-input]
shortcode numeric value given by the customer.
To use other steps' products, in the option's value, type the IDs of the desired steps separated by a comma. These IDs can be found in the "Steps" settings group, before the titles of the steps list.
Hide the quantity
If these two settings have equal values then the quantity will be hidden.
«Cart rules» is the setting to add rules or limitations by selected items. See description.
«Cart products placeholders» setting allows to output product slots in the widget according to the minimum products selected setting value. It supports the same types and values as the «Minimum/Maximum product quantity» settings.
«Total rows» is the setting to output different summary data. See description.
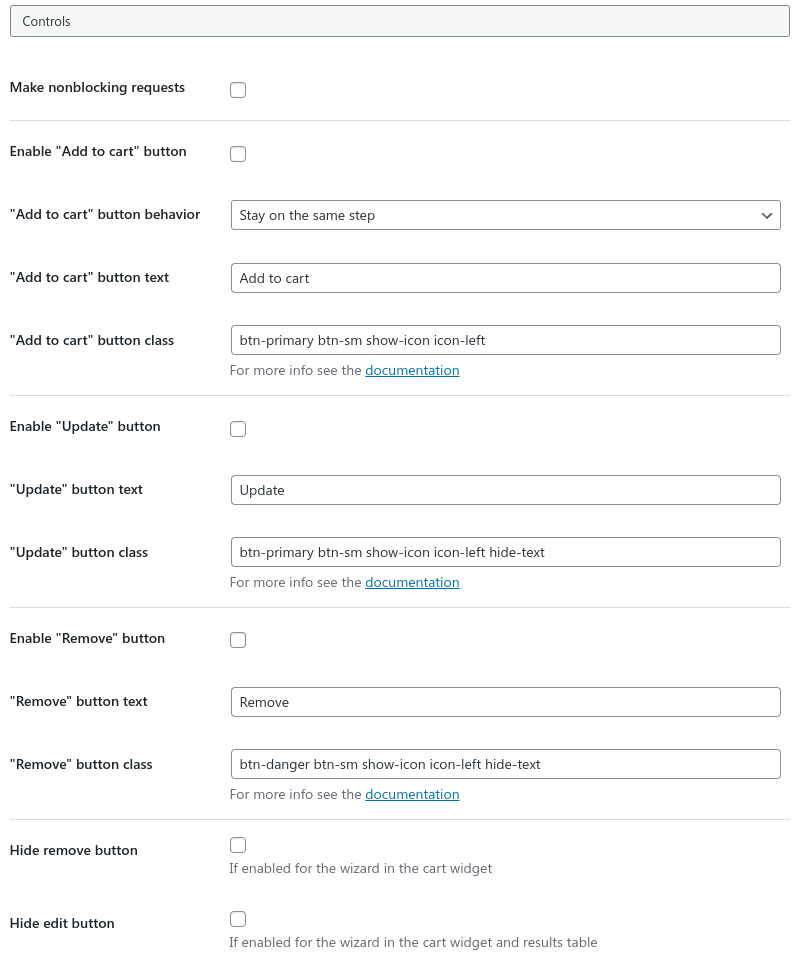
Control Buttons Group
All controls have unified styling possibilities. See description.
The lower settings allow to add individual cart controls to each product. By default, each such action makes a server request and blocks the wizard activity. In case you want the customer have a possibility to products to cart without waiting these requests are done use the «Make nonblocking requests» setting.
The «Enable "Add to cart" button» option enables/disables the "Add to cart" button on each product of this step.
The «Add to cart button text» option defines the text on the "Add to cart" button of this step.
The «Add to cart button class» option is also available.
The «Enable "Update" button» option shows the Edit button in the wizard.
The «Update button text» option defines the label of the Update button.
The «Update button class» option works similarly to the "Add to cart" button class.
The «Enable "Remove" button» option shows the Remove button.
The «Remove button text» option defines the label for the Remove button.
The «Remove button class» option works similarly to the "Add to cart" button class.
The «Hide Remove button» option hides the Remove button if it is set as enabled from the "Control General settings".
The «Hide Edit button» option hides the Edit button if it is set from the "Control General settings".
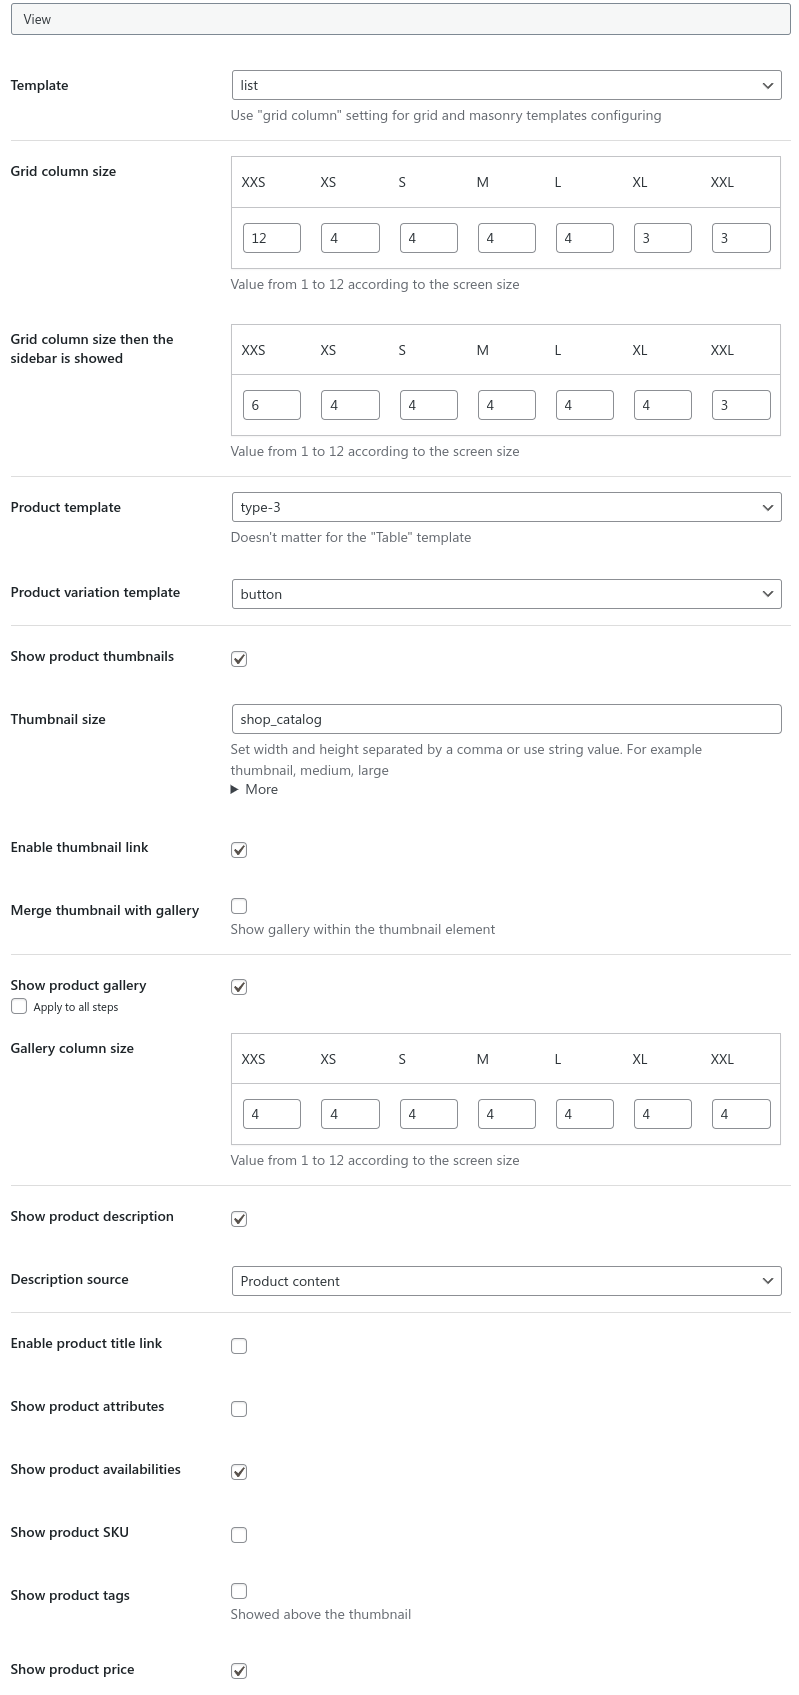
View Group
This group sets the options for the presentation of the products of this step.
The «Template» setting defines the layout of the products of the current step. There are several options there: list, table, masonry, grid.
The templates of these steps are based on the php-files found in the plugin_directory/views/form/layouts and theme_directory/woocommerce-products-wizard/form/layouts folders.
The «Grid column size» option works with the Grid template formats grid, carousel, and masonry templates. Define a column width in percentage or using another CSS unit for each specific screen size.
The «Set the Grid column size after the sidebar is shown» option is the same as the «Grid column size» but then the sidebar is visible.
The «Product template» setting changes the view of the products in the current step. The available options (type-1 to type-10) are formed in the php-files found in the plugin_directory/views/form/item and theme_directory/woocommerce-products-wizard/form/item folders.
The «Merge thumbnail with gallery» option shows the gallery images in thumbnails, formatted as a carousel.
The «Gallery column size» option changes the product gallery column size. Define a percentage value for each specific screen size.
The «Variation template» option changes the layout of the variable products options list. There is the "image" view available as well. This is possible to select an image via a setting called "Products wizard thumbnail" on the admin-side of a specific value of a registered product attribute.
The «Enable title link» option wraps the product titles by their links and opens the product page in a new tab.
Moreover, there are some more options that let you have full control over the visibility of the elements of a product.
Specifically, you can check to show the options:
Show product galleries
Show product description
Show product attributes
Show product availability
Show product SKU
Show product tags
Show product price
The «Product description source» option defines the source for the description of the products presented in the specific step. Available options are: product description, product short description, or nothing.
For the thumbnails you can set the «Product thumbnail size» option. It might be one of the already registered sizes you can find by clicking the "More" setting, or a pair of integers separated by a comma, e.g. "50,50".
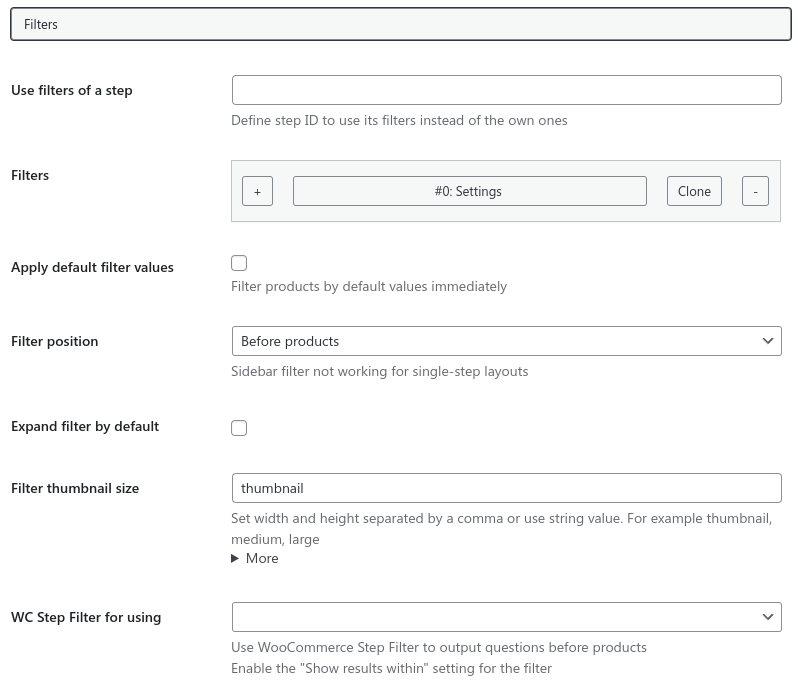
Filters Group
The «Filters» group adds filters for the products of the step. You can add any number of filters.
This is possible to use the same filters for a few different steps. This way the applied filters will be the same for all of these steps. Do to this define a step number for the
«use filters from another step» setting.
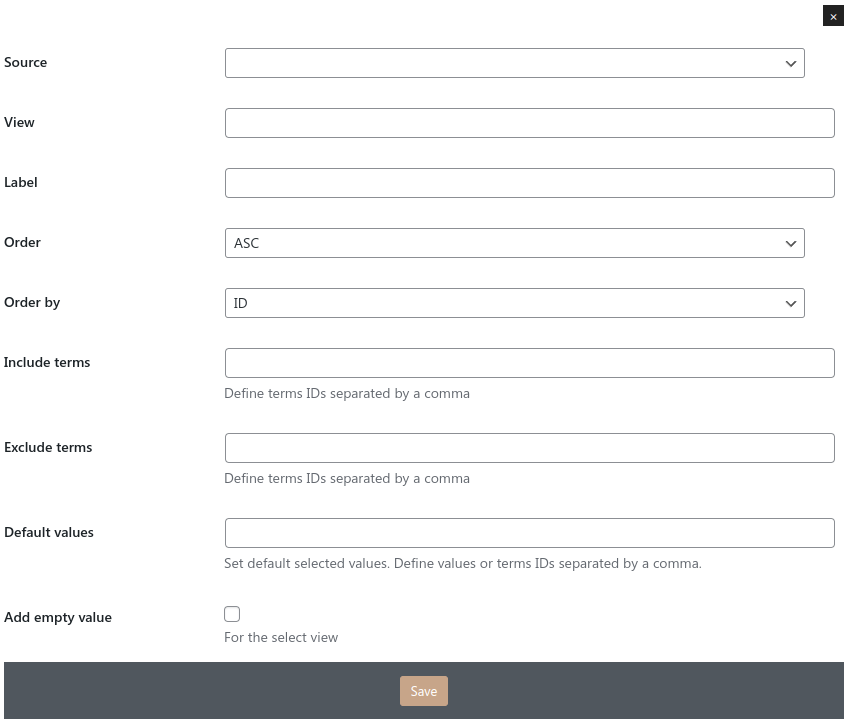
To create a filter, first select one of the predefined sources and then one of the suggested views.
You can select the "range" view for a product attribute, but keep in mind it works well with numeric attribute values only.
Each filter is entitled automatically. You are free to change its name. This is the label of the filter the end-user sees.
It is possible to include/exclude specific values for the filters, such as categories, tags and attributes. To do so, type the IDs of the terms you wish separated by a comma.
Similarly, you can define «Default selected filter values». If you use this option, the products of the selected option of the filter will appear by entering this step.
Also, you can set some «Default values» of products in advance, before your customer uses the filter.
The «Filter position» option defines the position of the filter. The filter can be either: on the right / before the products / or in the sidebar. Keep in mind that the sidebar filter works only with the tabs mode.
The «Expand filter by default» option is used when you want to have the filter opened when the step is shown.
The «Filter auto-submit» setting makes the filter be applied on any change made in it.
The «No products until filtering» makes mandatory to apply filter to see any products.
For the image-based filters you can set the «Thumbnail size» option. It might be one of the already registered sizes you can find by clicking the "More" setting, or a pair of integers separated by a comma, e.g. "50,50".
This is possible to use the WooCommerce Step Filter plugin to output a flexible multi-step filter for a step before showing the products. Step filter should have the «Show results within the filter» setting on. All native wizard filters will be ignored.
Filter group settings
Settings of the Filter option
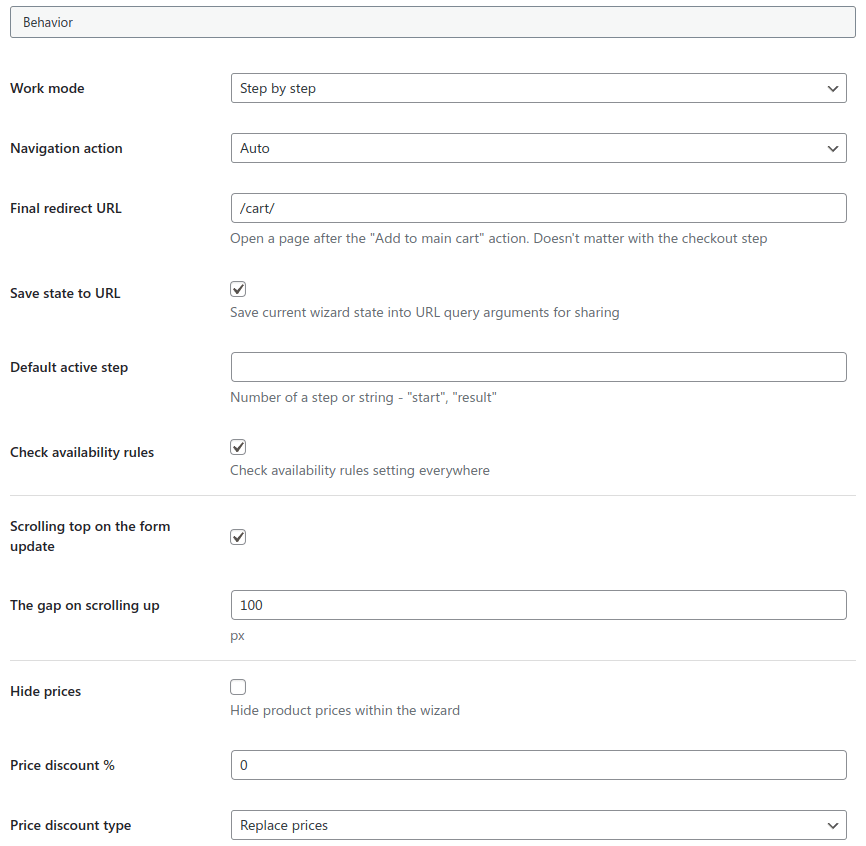
Behavior Settings
The «Work mode» is the setting that defines the main wizard's view and behavior. The available options are:
«Step by step» - this mode shows the steps of the wizard as tabs. This mode does not let you jump from the first step to the last one. The only way to skip a step is to use the "Skip" or "Go to results" buttons.
«Free walk» - this mode shows the steps as tabs. It also lets you open any step you want;
«Single step» - this mode opens vertically all the steps of the wizard at once;
«Sequence» - this mode output the steps vertically, but make them visible one after the other according to the current step;
«Expanded sequence» - this mode output all the steps vertically, but make them available one after the other according to the current step.
The «Navigation action» option defines what happens after the click on a navigation button. Available options here are: submit and move to the next step, just move to the next step, do nothing, or use the auto smart mode.
The «Final redirect URL» option defines the URL of the page which will be opened after the wizard selection confirmation.
«Save state to URL» setting makes possible to get a current wizard cart and active step via URL to share the selection via link. Works the same as the share button control.
«Default active step» setting allows to pre-define a specific step active by-default. Enter a step number, "start", or "result".
The «Check Availability rules» option enables/disables ALL Availability rules everywhere in the wizard.
The «Scrolling on top of the page on navigation» option scrolls on the top of the page on every click of the navigation buttons.
By default the page will be scrolled top only if the most of the wizard part isn't in the view. With the «Strict scrolling top on update» you can force to always scroll the page.
The «The top-margin on scrolling in (px)» option defines the top-margin after scrolling the page to the top.
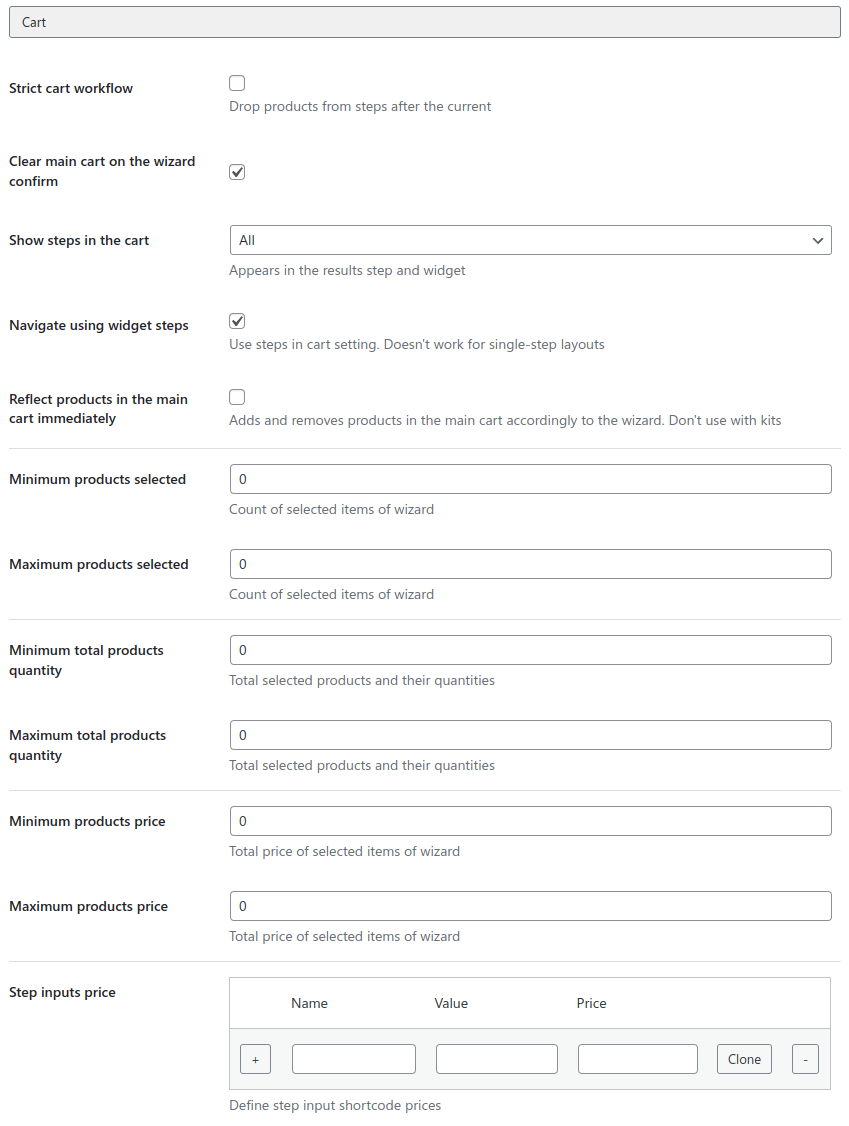
Cart Settings
The «Strict cart workflow» option removes all products from the steps after the active one. This option might be helpful if you have high-loaded Availability rules for products.
Removing products from the previous steps
The default behavior of the wizard is to remove the products from the steps after the active one. To avoid this, disable the «Strict cart workflow» setting.
The «Clear main cart on the wizard confirmation» option always truncates the cart of WooCommerce any time you complete the wizard workflow.
The «Show step names» setting shows the names of the steps in the results step and PDF. You can select between the available options to show "all the steps" or "only the selected ones".
The «Reflect products in the main cart immediately» option adds the products of the wizard in the WooCommerce cart.
«Cart rules» is the setting to add rules or limitations by selected items. See description.
«Total rows» is the setting to output different summary data. See description.
The «Group products into kits» setting changes how the selected products behave in the native WooCommerce cart. Possible values are:
«No grouping» - selected products will not be anyhow connected to each other. Using it this might not be clear what products are added together. Also, step custom inputs data will not be saved somewhere;
«Separated products» - the products will be presented in separated products, although still bonded. The first product or defined base product will be the root of the kit;
«Combined products» - shows only the root product in the cart with all other products and step inputs as its attributes. The first product or defined base product will be the root of the kit.
You can also use the wizard's thumbnail as a root product thumbnail.
You can select a «Kit base product» to use as the root product of your kit. Otherwise, the first product of the wizard's cart will be the root one.
This is possible to not count a kit children in the cart. Kit will be counted as one product, whatever products it has attached.
Enable the «Edit button for the kit in the main cart» to allow the customer to go back and change the kit's products. The wizard will be opened on the last step of the kit's products.
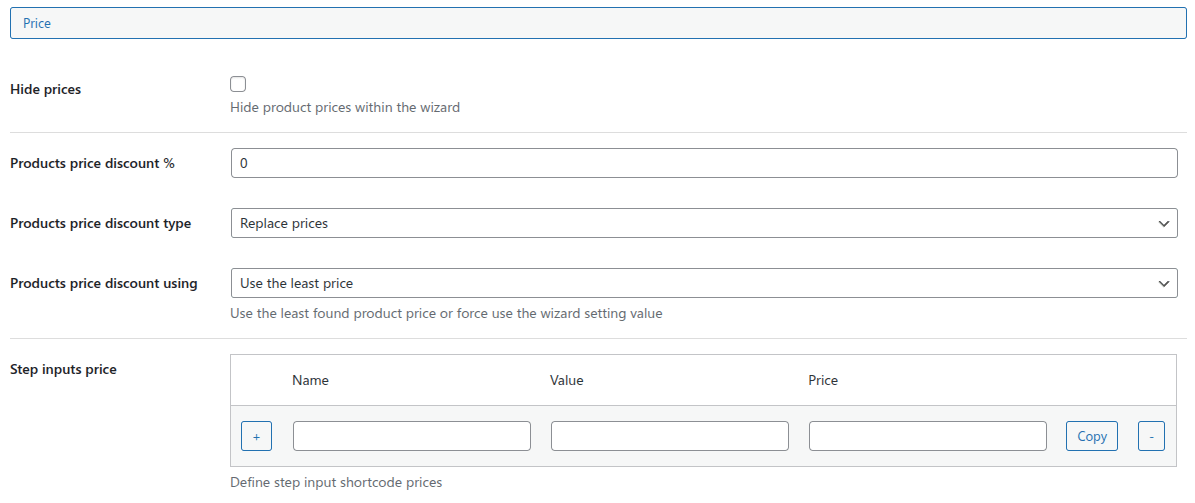
Price Settings
This is possible to Hide all prices within the wizard. Keep in mind the prices can be visible again after adding products into the native WooCommerce cart.
The «Products price discount» setting reduces all products price by a value in percents.
This is possible to output this discount as sale with old/new price, or just replace the price by the reduced one.
As that's also possible to define the discounts at product and combination level, there can be different final price for each specific product. To handle that use the «Products price discount using» setting. It allows to select the least available discounted price or force use the wizard's percentage discount value.
The «Step inputs price» setting allows to define price for custom steps inputs made using the [wcpw-step-input] shortcode. Their price will be added to the final price of the kit. It will not work without combining products into kits.
This is necessary to define the setting name and its price at least. This way any value of this setting will add the defined price to the totals.
But this also possible to define an exact combination of the step input name, value, and price. It will be applied instead of the common input name price.
Thumbnail Settings
It is possible to show your customers how the product combinations they made might look like. That requires a preliminary configuring of the image canvas. The generated thumbnail will be used as a thumbnail for the combined parts of a kit and the kits with a pre-defined base product. It also can be output while the wizard workflow in the description of the steps of PDF.
Prefer transparent PNG images for better overlapping.
To use the canvas:
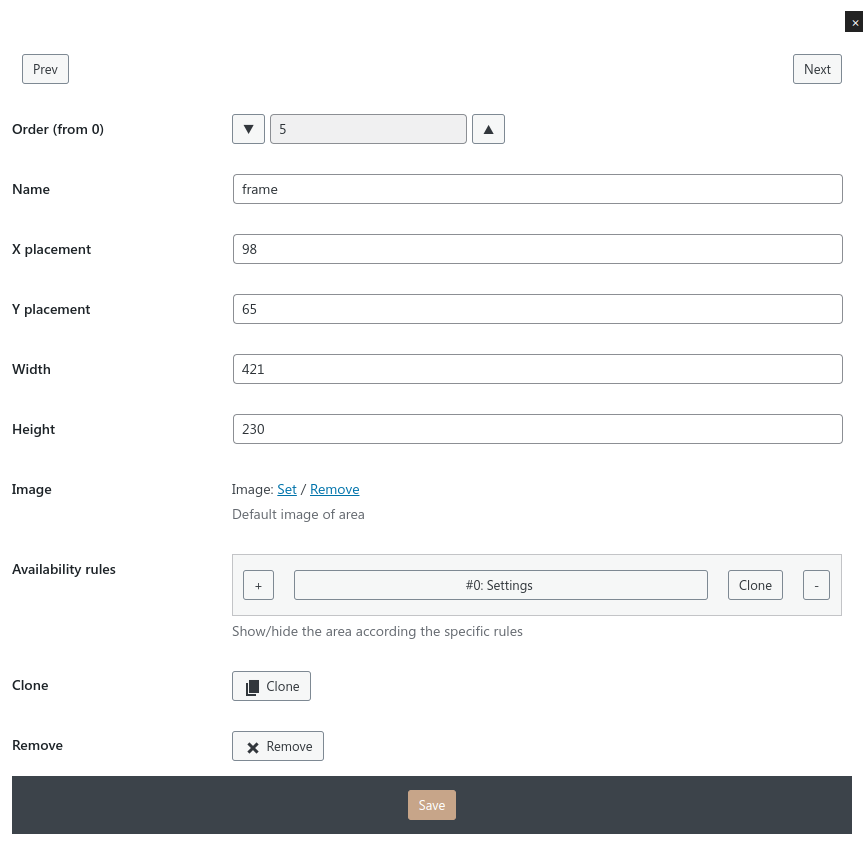
Click the «Generate thumbnail» setting and define its Width and Height.
On the thumbnail's canvas create the areas to show the (parts of the) products. Click the «Add item» button to add a new area inside the canvas. The total number of areas you add is shown on the right side of the row near the «Clear canvas» button.
You can change the areas' position by drag and drop. You will see it indicates the X and Y settings.
Moreover, that's possible to rotate the area clockwise using mouse. The angle will be reflected into the Rotate setting.
You can also change their sizes and z-index order. You can do so by the area settings. The position of the layers affects the images overlapping on the canvas.
Each area can have a name. This name helps you to put your image in the right position on the canvas.
Also, that's possible to leave some developer notes in a special field. It will not be visible anywhere, except for the admin side.
Using uploaded images for thumbnail generation
You can upload images in the areas of the canvas e.g, a custom logo or photo.
Use the area name as the "name" attribute of the [wcpw-step-input type="file"] shortcode in order to place the uploaded image in the correct place.
You can define a default image for the areas. You can replace it later if you wish.
When you have designed your canvas you can configure the products or the categories.
The Generated thumbnail will be shown in the widget then any of products is in the cart. If you want to show the thumbnail in another place, for example on the Results step or in the PDF file, use the
[wcpw-generated-thumbnail-url] shortcode to get its link.
The available thumbnail settings shown in the next image are straightforward.
If the area setup is finished you can Lock it to not accidentally change it.
Thumbnail settings
Thumbnail area settings
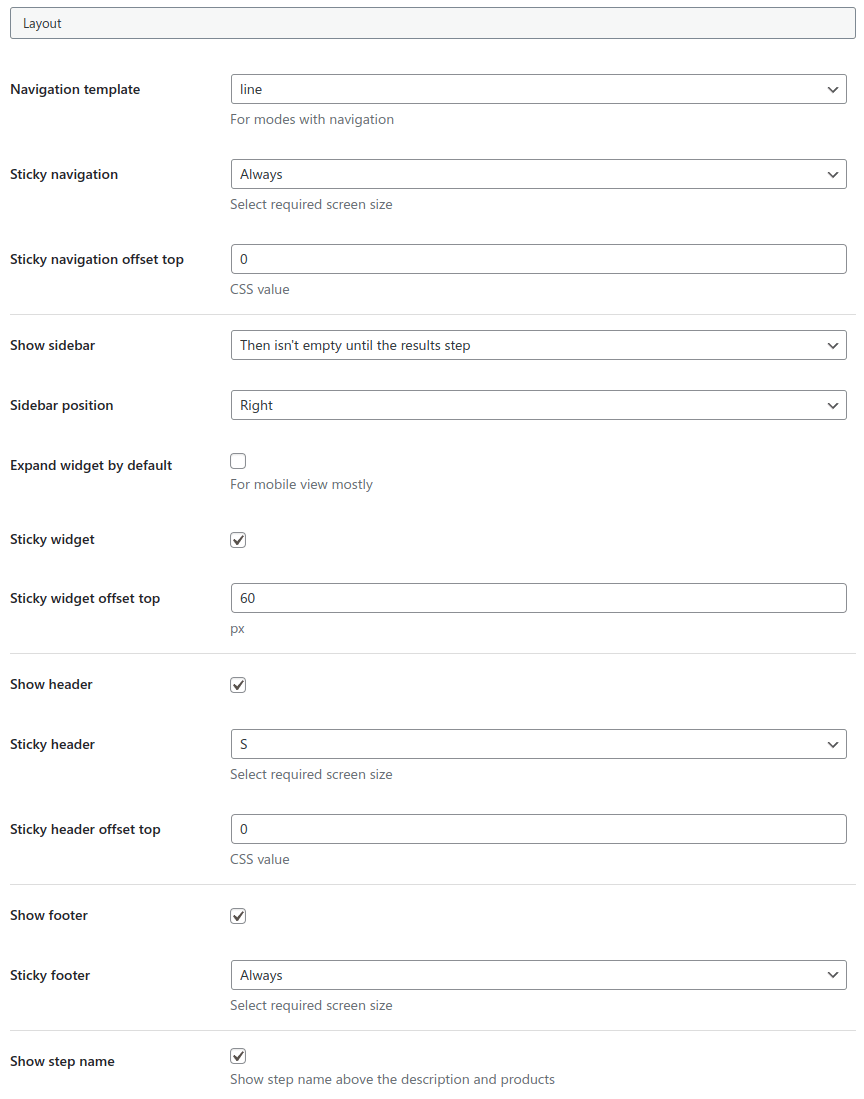
Layout - General settings
Using the «Sidebar position» setting you can control sidebar place for different screen sizes.
With the «Sidebar width» setting that's possible to change the sidebar width for different screen sizes. It uses CSS variables with a unit. Without a unit the value will be converted to pixels.
By the «Navigation template» option you can choose the style of the navigation tabs. Available values here: tabs, pills, buttons, line, line-horizontal, or none.
«Toggle navigation to mobile on screen size» setting allows to switch the selected navigation template to the mobile vertical button on a specific screen size.
Use the «Navigation button class» to change the mobile button view.
All controls have unified styling possibilities. See description.
The «Sticky navigation» option controls if the navigation bar will be sticky on a specific screen size.
The «Sticky navigation offset» sets the gap between the sticky navigation bar for different screen sizes.
The «Expand widget by default» option lets you present the widget opened.
The «Sticky widget» option controls if the cart widget will be sticky.
The «Sticky widget top-offset» sets the gap between the sticky widget for different screen sizes.
Widget navigation possibility
If you decide to show the names of the steps you can «Use them in the widget during its navigation».
You can «Show/hide the header and footer» of the wizard.
The «Sticky header» and «Sticky footer» options control if these elements will be sticky on a specific screen size.
The «Sticky header/footer offset top» tunes the gap between the top of the screen and the sticky element for different screen sizes.
The «Show step names» options show the step names above products and description.
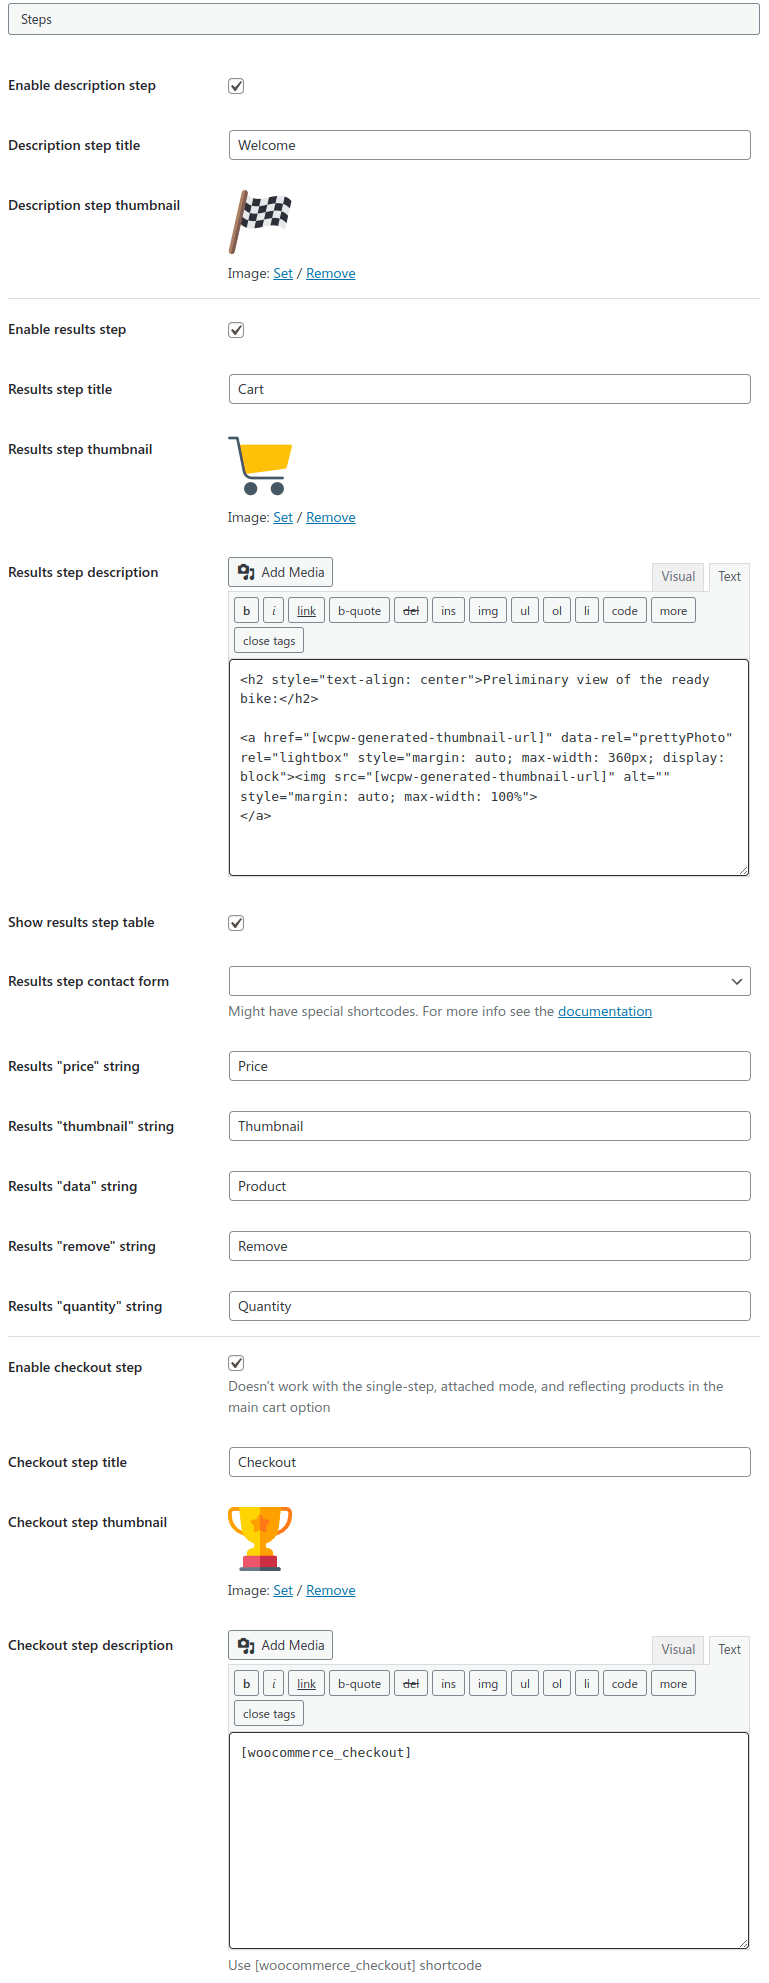
Steps General settings
The «Enable Description step» option enables/disables the first step of the wizard. This step contains the description text of the wizard.
The «Description step title» option sets the description in the navigation tab for the first step. E.g. you can name it: "Welcome".
The «Description step subtitle» allows to output additional navigation text.
The «Description step thumbnail» setting is used to output the navigation item image.
The «Enable Results step» option enables/disables the last step containing the total selected products.
The «Results' step title» option sets the Results' step text in the navigation tab.
The «Results' step description» option sets the Results' step description text that is shown before the table.
The «Show Results' step table» option sets on/off the cart table on the result step. For example, it can be disabled and use the widget instead.
The «Results step contact form» option defines the ContactForm7 form in which the results of the wizard will be presented below the products-selection table. Using this form you can send emails with the content of the cart in PDF format.
PDF attachment
If there is no attached PDF file in the email, add the [wcpw-result-pdf] shortcode in the «File attachments» field.
Use the «Results strings» option to change the captions of the Result page on the Result step and in the PDF file.
It is possible to have the «Checkout step» enabled. This option forces the Checkout step as the last step of the wizard. By using this option your customer can do checkout from the wizard without extra navigation.
If you want your customer to navigate to the WooCommerce checkout page from the wizard, be sure that in the «Checkout step description» the [woocommerce_checkout] shortcode is found.
That's also possible to set the checkout step title, subtitle, and thumbnail if necessary.
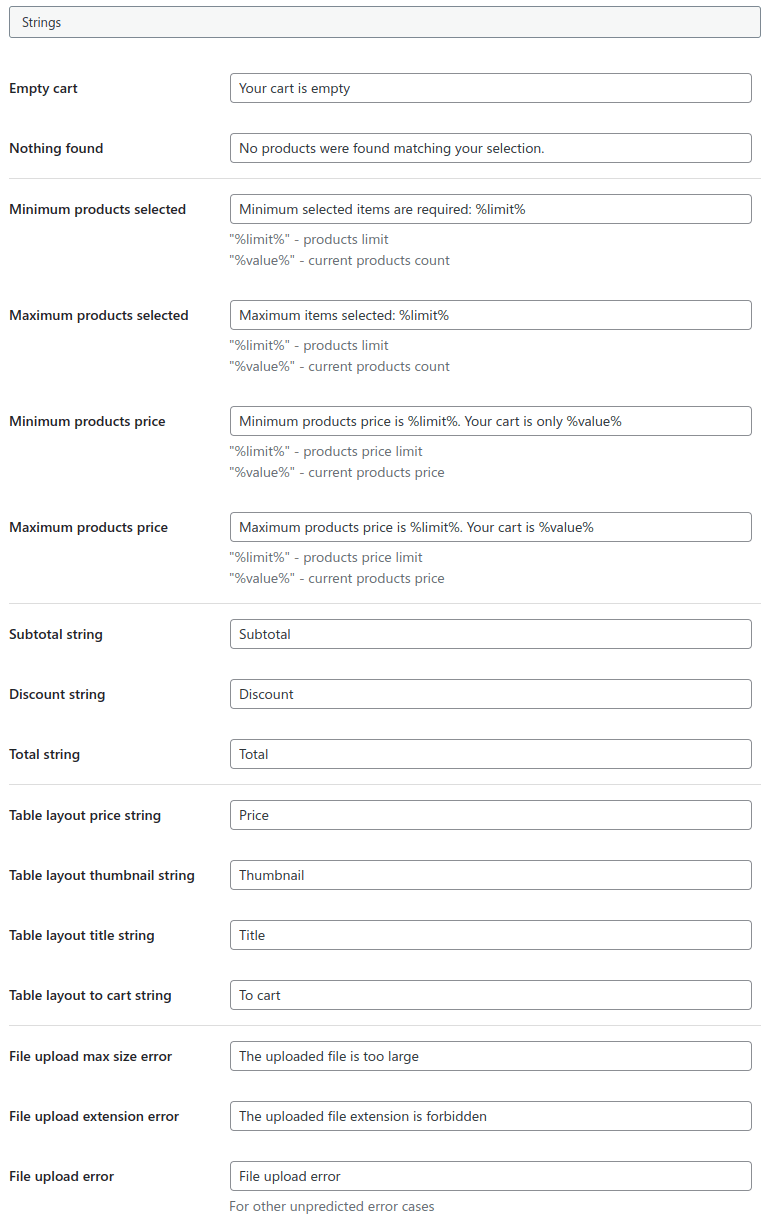
Strings - General settings
Strings - General settings allow setting the labels of the strings through the wizard. Their usage is straightforward.
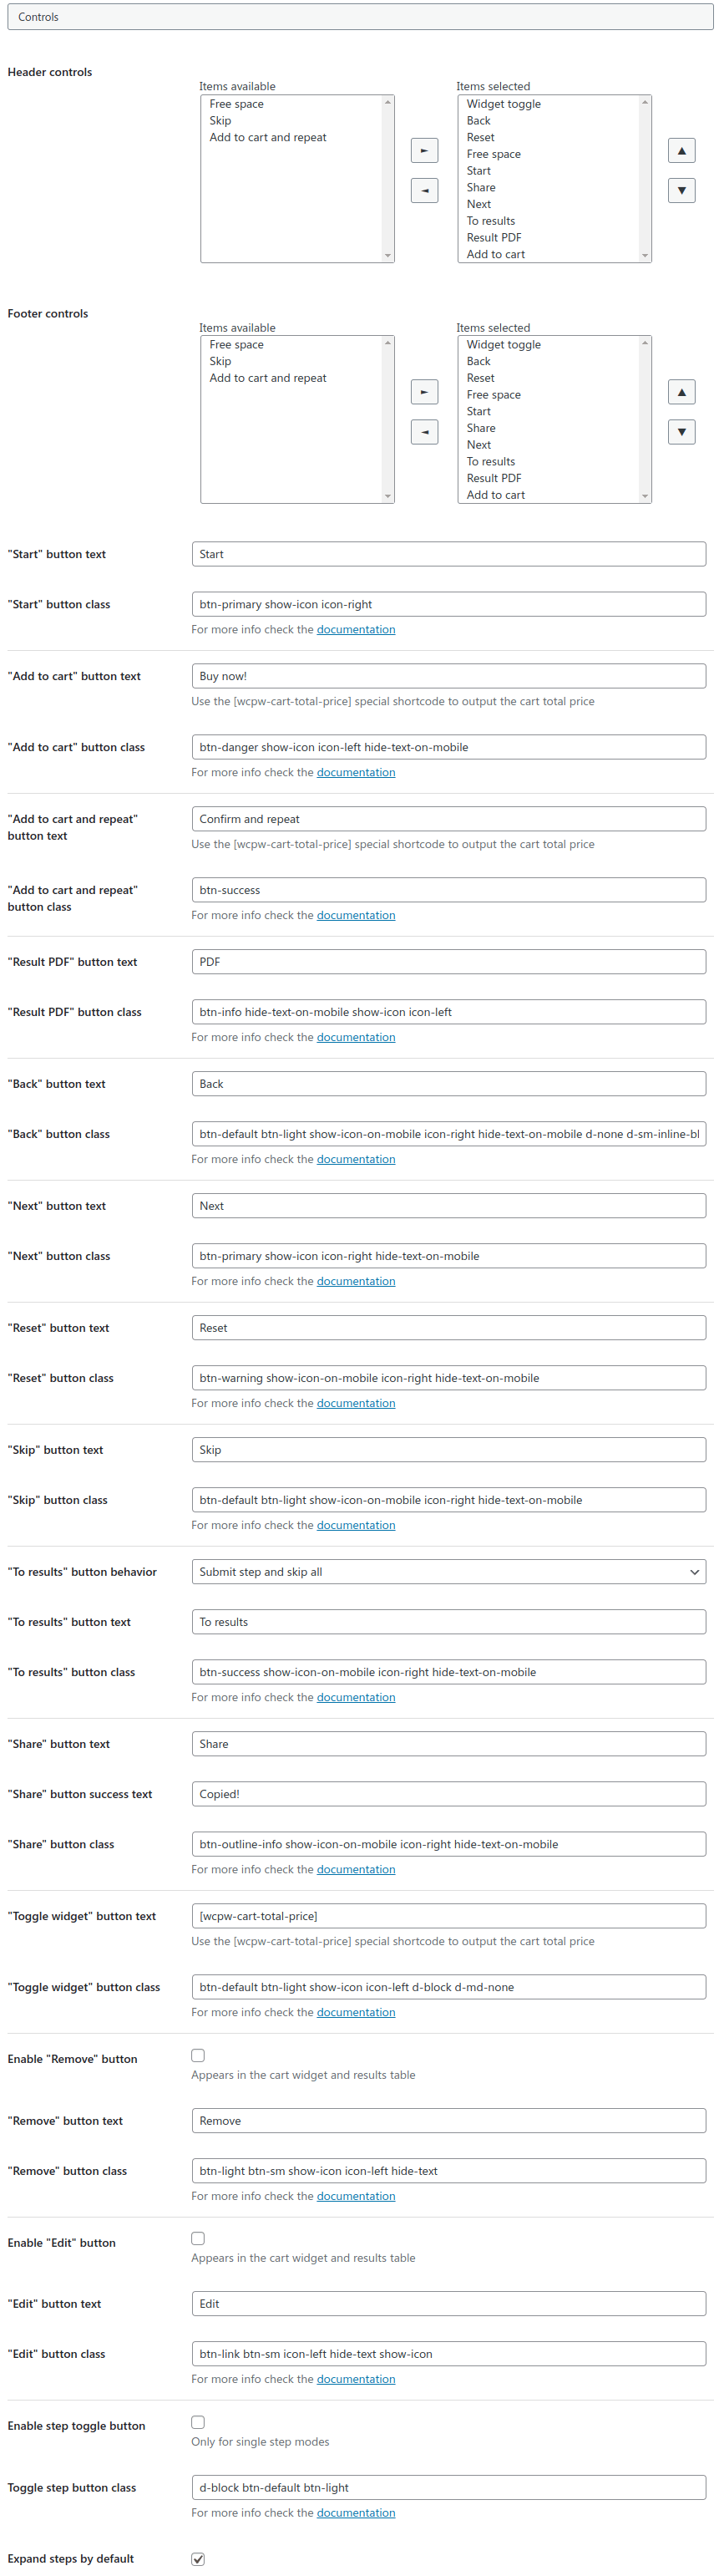
Control buttons - General settings
The Control buttons General setting defines several options on the Navigation Control buttons.
You can choose specific controls for header/footer and define their order. There are also "free space" elements available to justify controls left, center, or right specific way.
That could be helpful to use the [wcpw-cart-total-price] shortcode to output current selection total value as a button text.
All controls have unified styling possibilities. See description.
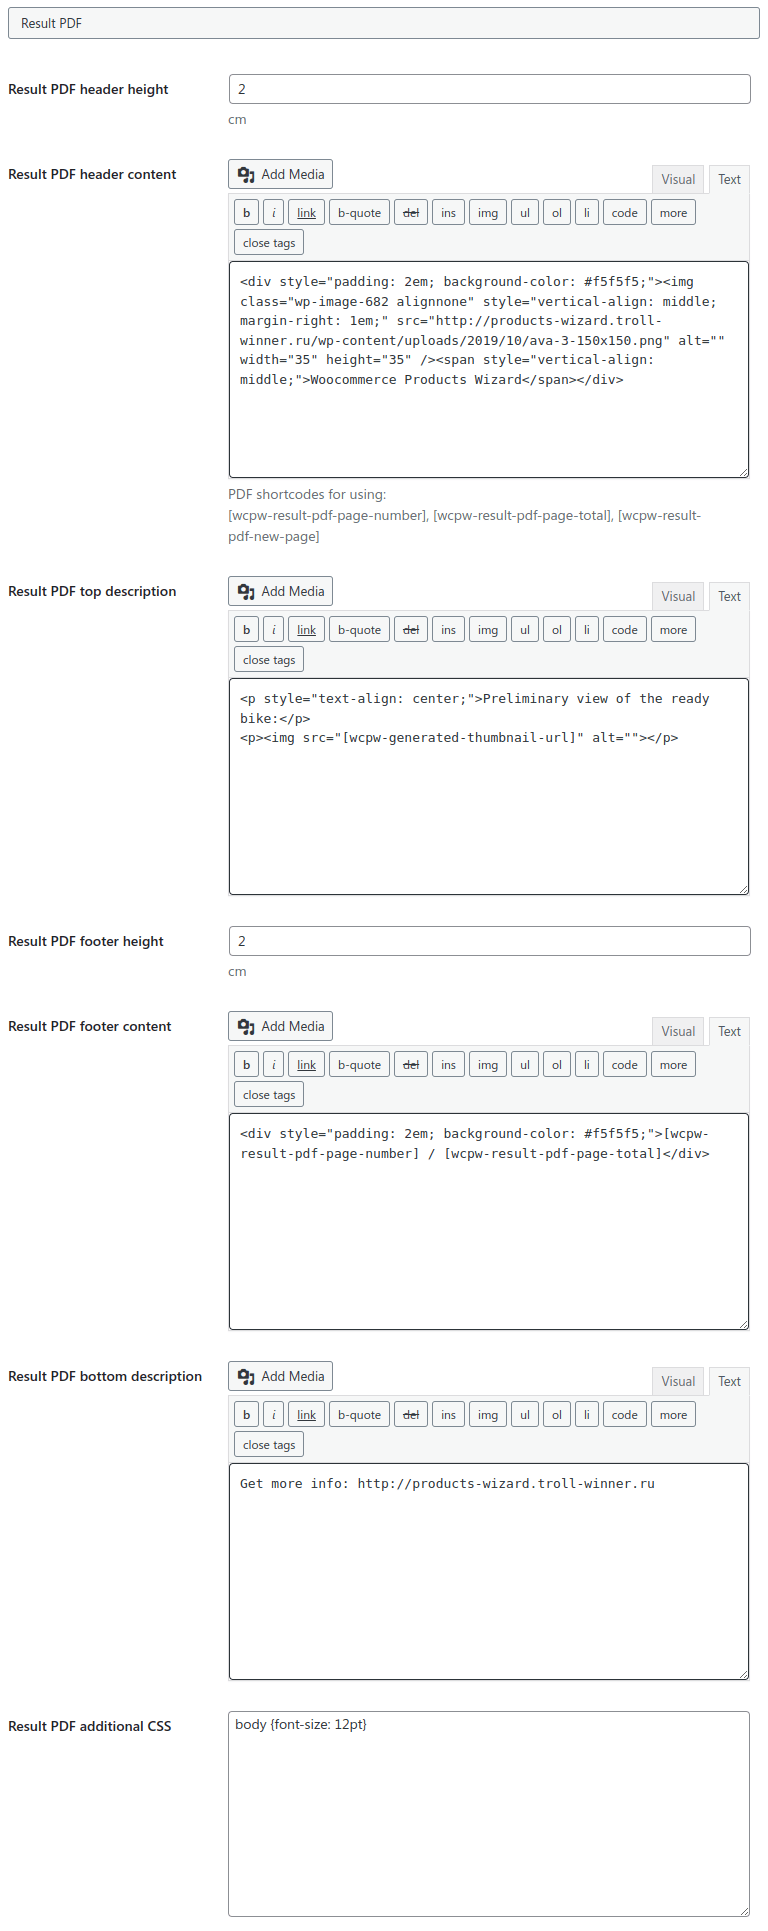
PDF Settings
PDF customization
If you wish to modify the default PDF template make a copy of views/result-pdf folder to your active theme (or child theme) directory to woocommerce-products-wizard/result-pdf
There is a setting to change the default file name of the result PDF.
The «PDF spaces» setting allows to define page all sides spaces. Be sure top/bottom spaces are enough to fit header/footer into.
The «PDF header content» will be used as the header for each page. There are a few native shortcodes available:
[wcpw-result-pdf-page-number] - The current page number;
[wcpw-result-pdf-page-total] - Total pages count.
If you use a ContactForm7 form in the wizard you may set its email shortcodes via the «Result's step contact form» setting.
The «PDF top description»: content will be placed before the Results table.
The «PDF footer content»: will be used as the footer for each page. It is also possible to use dedicated shortcodes to output the current page number and total pages number.
The «PDF bottom description»: content will be placed after the results table.
The «PDF additional CSS» setting provides a possibility to pass extra CSS rules into the PDF file.
This is possible to output Contact Form 7 field values while sending the email with an attached PDF.
To do so use the same field shortcodes from the Contact Form "Mail" tab, for example: [your-name], [your-email].
Initially PDFs have is-default class around the elements, while as
PDFs sent via a Contact Form 7 have the is-contact-form-7 class instead.
So this is possible to hide contact form fields using such extra CSS:
                            .show-for-cf7 {display: none}


                            .is-contact-form-7 .show-for-cf7 {display: block}
And the field example:
<span class="show-for-cf7">Client name: [your-name]</span>
With the «Attach PDF to the root product» setting the generated PDF file will be attached to a root product of the wizard kit.
Filters - General Settings
The Filter General settings define the filters' string labels throughout the wizard.
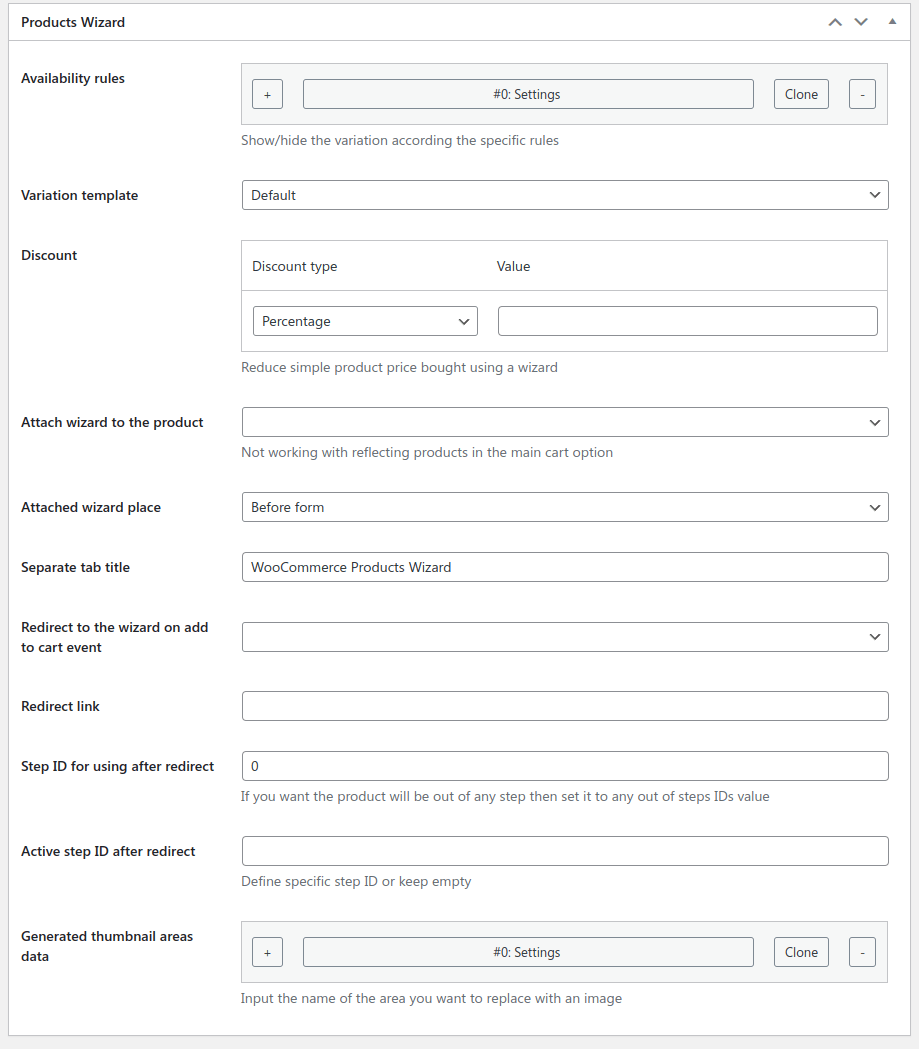
Product Settings
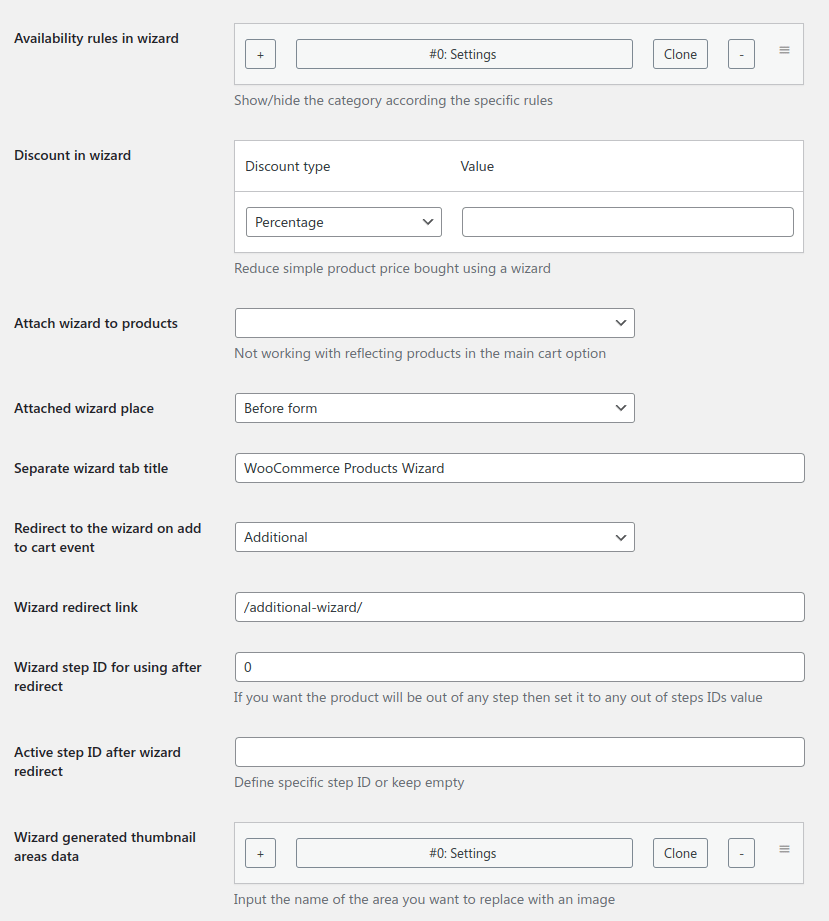
«Availability rules» is a unified setting to control item appearance. See description.
You can also set availability rules for each variation of a variable product.
You can add a «Discount» to the product bought using a wizard. Possible values are:
«Percentage» - define a value from 1 to 100 in percents to make appropriate discount;
«Fixed» - define a value on which product price will be reduced;
«Precise price» - overwrites product's price by the defined one.
Each discount rule can has own «Availability rules» to be applied.
Moreover, that's possible to apply discount rule to all or specific wizard only.
«Generate thumbnail areas data» is used to replace generated thumbnail areas with specific images then the product is in the cart. It's necessary to define the area name to be used and the image for pasting. The number of these rules is unlimited.
It's also possible to set the «Availability rules» to apply the image to an area.
You can also set the areas data for each variation of a variable product.
This is possible to attach a wizard to the product to make it works as a usual composite product. Use the «Attached wizard» setting to select one.
«Attached wizard place» allows to output the wizard:
«Action» - any available page action. You can find the list of the default actions on this page. This is also possible to define a wizard output priority to place is before or after elements, what will be output on the same action;
«Add-to-cart button modal» - prevents immediate adding the product to cart, and opens a modal with the wizard;
«Separate tab» - there will be a new tab in the native tabs section of the product. This is also possible to define a tab output priority to place is before or after other tabs.
Set the «Attached wizard title» to change the tab name or add-to-cart button text.
To let the attached wizard to know the actual parent product price use the «Attached product price element selector» setting to get the price from there and pass it into the wizard. That could be helpful if that's a variable product with different variation prices.
Set the «Price send delay» setting to pass it into the wizard.
To output this root product price, use the «Master product price» source of a «Total rows» setting row. See description.
You can use a special feature to intercept the added-to-cart product and continue the workflow in a wizard on another page immediately.
First of all, select a value of the «Redirect to the wizard on add to cart» setting.
Secondly, define a «Redirect link» which will be opened after adding to cart event for this product.
Set a «Step ID for using after redirect» in which the product should be added. If you want the product will be out of any step then set it to any out of steps IDs value.
This is also possible to define the active step ID after the redirect via the setting.
«Variation template» setting change layout of the variable product options list above category settings.
Category Settings
Product category mostly have the same options and settings, as a single product have.
The only difference is category settings are applied to all its products, and can be overwritten by a specific product settings if necessary.
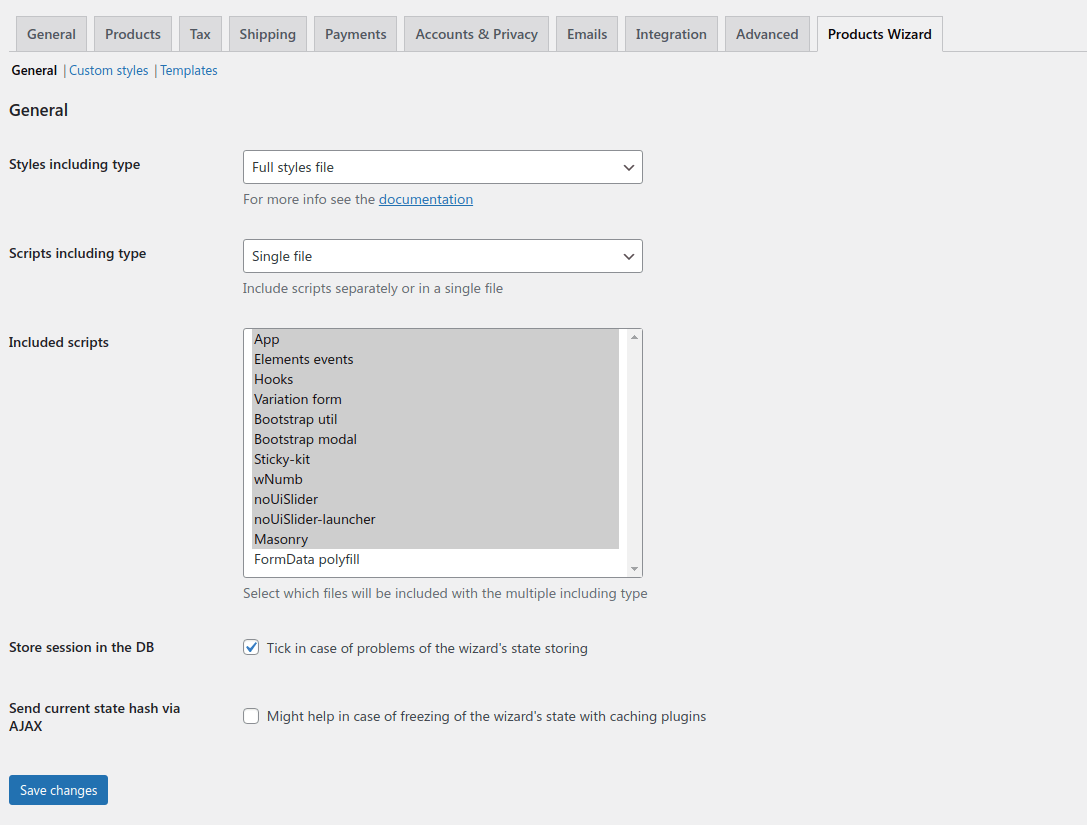
You choose the styles that will be included in the plugin.
«Full» is the self-sufficient style file. It applied all required styles to the plugin's elements.
«Basic» styles are fine for you if your active theme is based on the "Bootstrap 3/4/5" framework. In this case, this wizard's style will be inherited from your active theme's. Despite this, you can also add your own CSS-styling rules.
«None» value. doesn't include any styles at all. In this case you can create a full custom CSS-style from the plugin sources and tools or by your own approach for styling.
«Custom styles» include the file with your custom styles such as colors, font-size, and so on. To modify it go to the «Custom styles» sub-page.
The plugin is made using the newest ES6 modules scripts, so there is a setting to select «Scripts including type» - that could be a raw JS sources or build JS bundle.
Sometimes the server's configuration might face problems with the stored sessions. Examples are: the wizard can't go to the next steps, or the cart contents' disappear on a page refresh. In this case, tick the
«Store session in the DB» option. This option works much more reliable, but, probably, a tiny slower.
If you have a cache plugin on your site it might make the wizard's work unpredictable. This way the «Send current state hash via AJAX» setting might help to fix.
Custom Styles
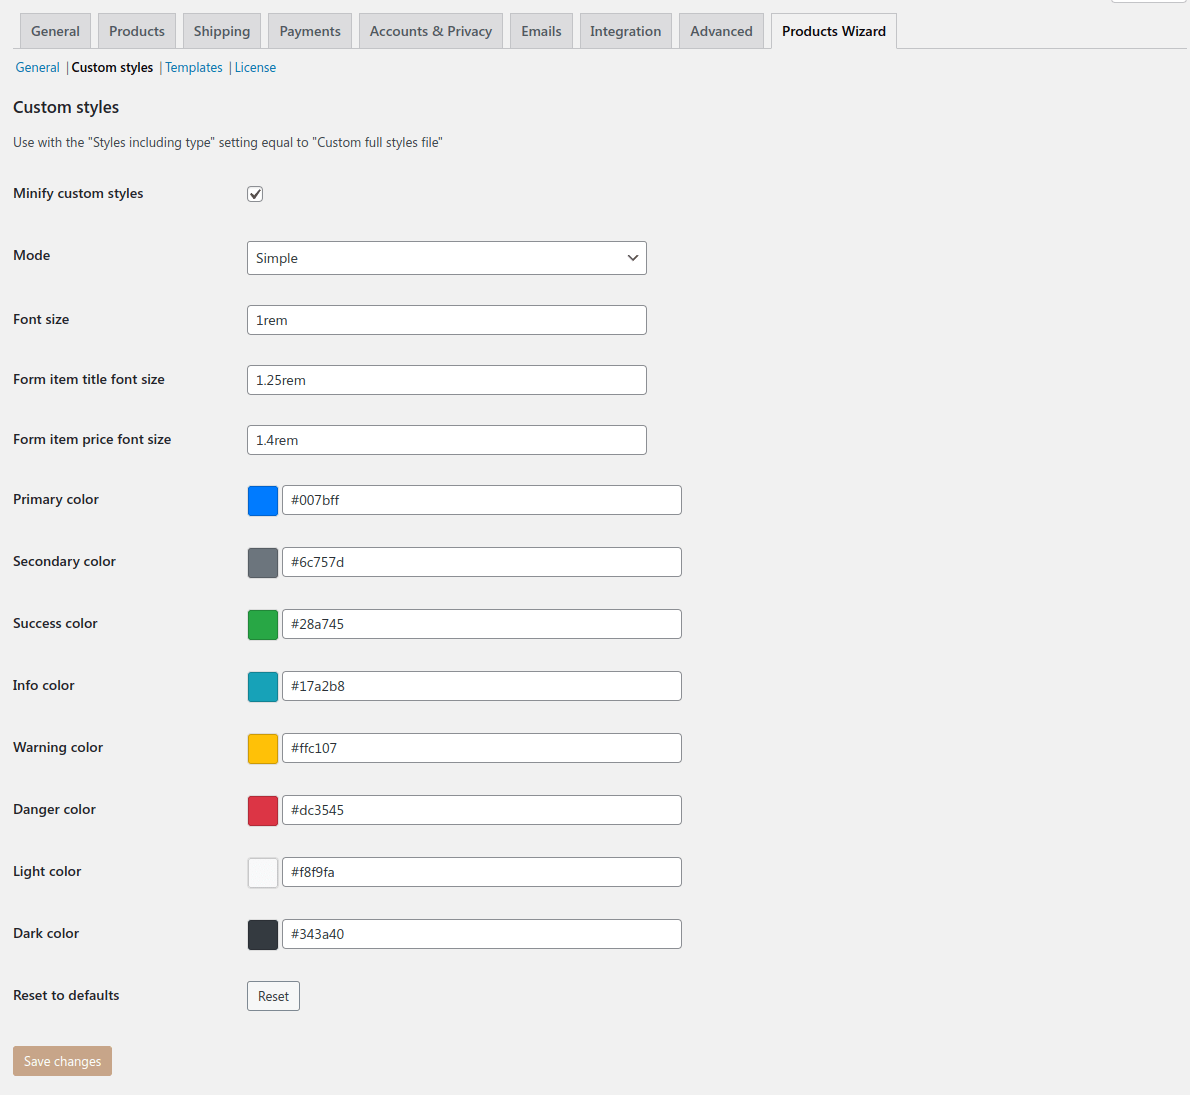
It is possible to reconfigure the plugin's styles according to your needs.
Don't forget to choose a «Custom full styles file» value of the «Styles including type» setting.
This is possible to «Minify custom styles» using the special setting. That might be helpful for the debug needs. In other cases keep this setting enabled to keep the CSS-file smaller and save your customers' traffic.
There are two modes for custom styling. The «Simple mode» provides only a few main variables to change.
Sometimes the wizard's fonts look very small on specific themes. To resolve this, adjust the «Font size» option. You can use any CSS units there, like "rem", "px", "pc", and so on. Apart from that, you can also change the product title and price font sizes.
You can also change the colors for different colorful elements of the wizard, like controls, buttons, and navigation.
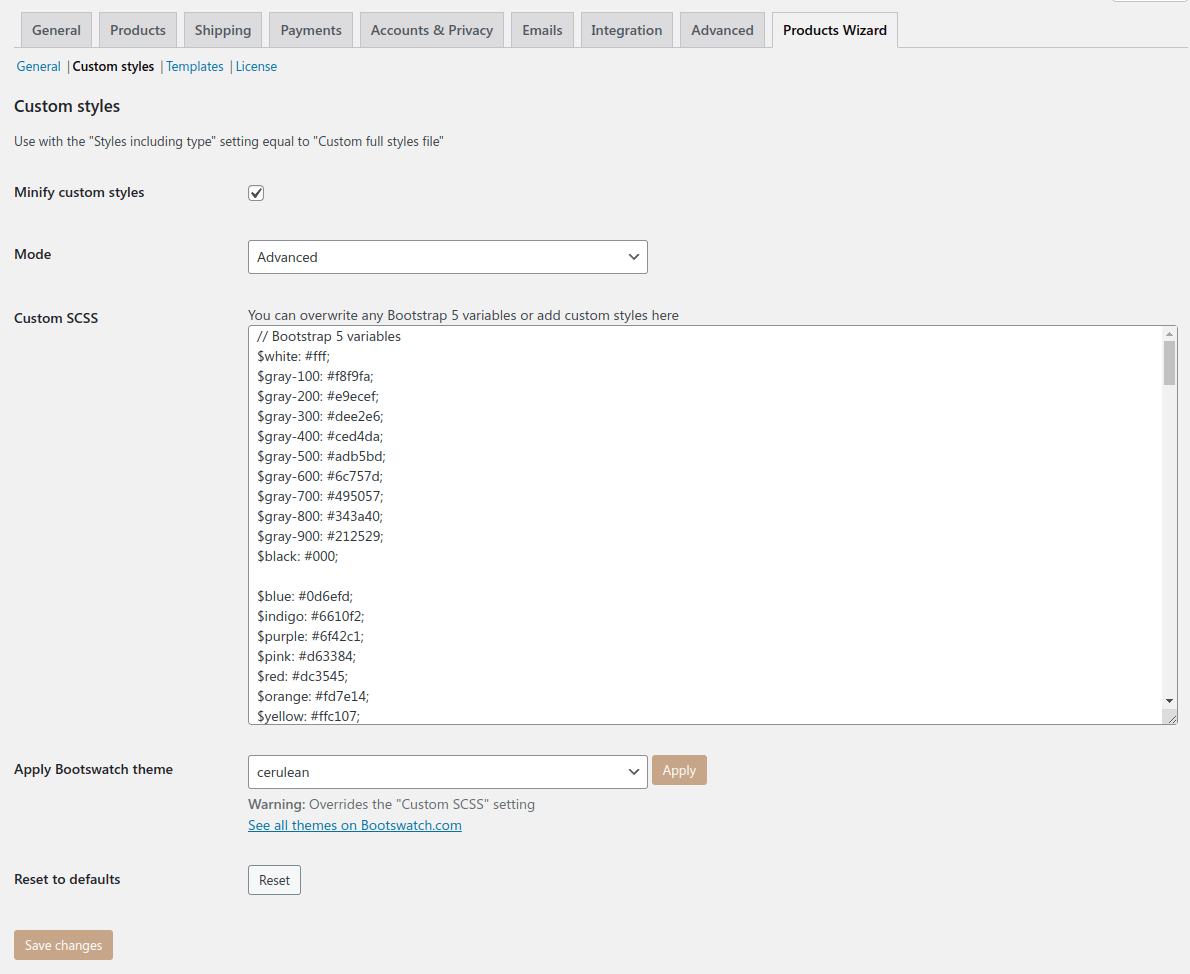
The «Advanced mode» allows you to change a great range of variables, but it requires SCSS knowledge.
All the variables of the plugin are available to be changed by using a text editor.
Advanced mode also supports using of a pre-defined Bootswatch themes, included to the plugin. Select a theme and click the «Apply» button once to use the theme for the wizards, but keep in mind the «Custom SCSS» setting will be overridden by the default values with the applied theme styles. You can modify custom SCSS setting after applying a theme.
In a case of a styling-command error, you will see a message while saving. The styling file will not be saved.
In case you need to reset your styles to their initial state click the «Reset to default» button once.
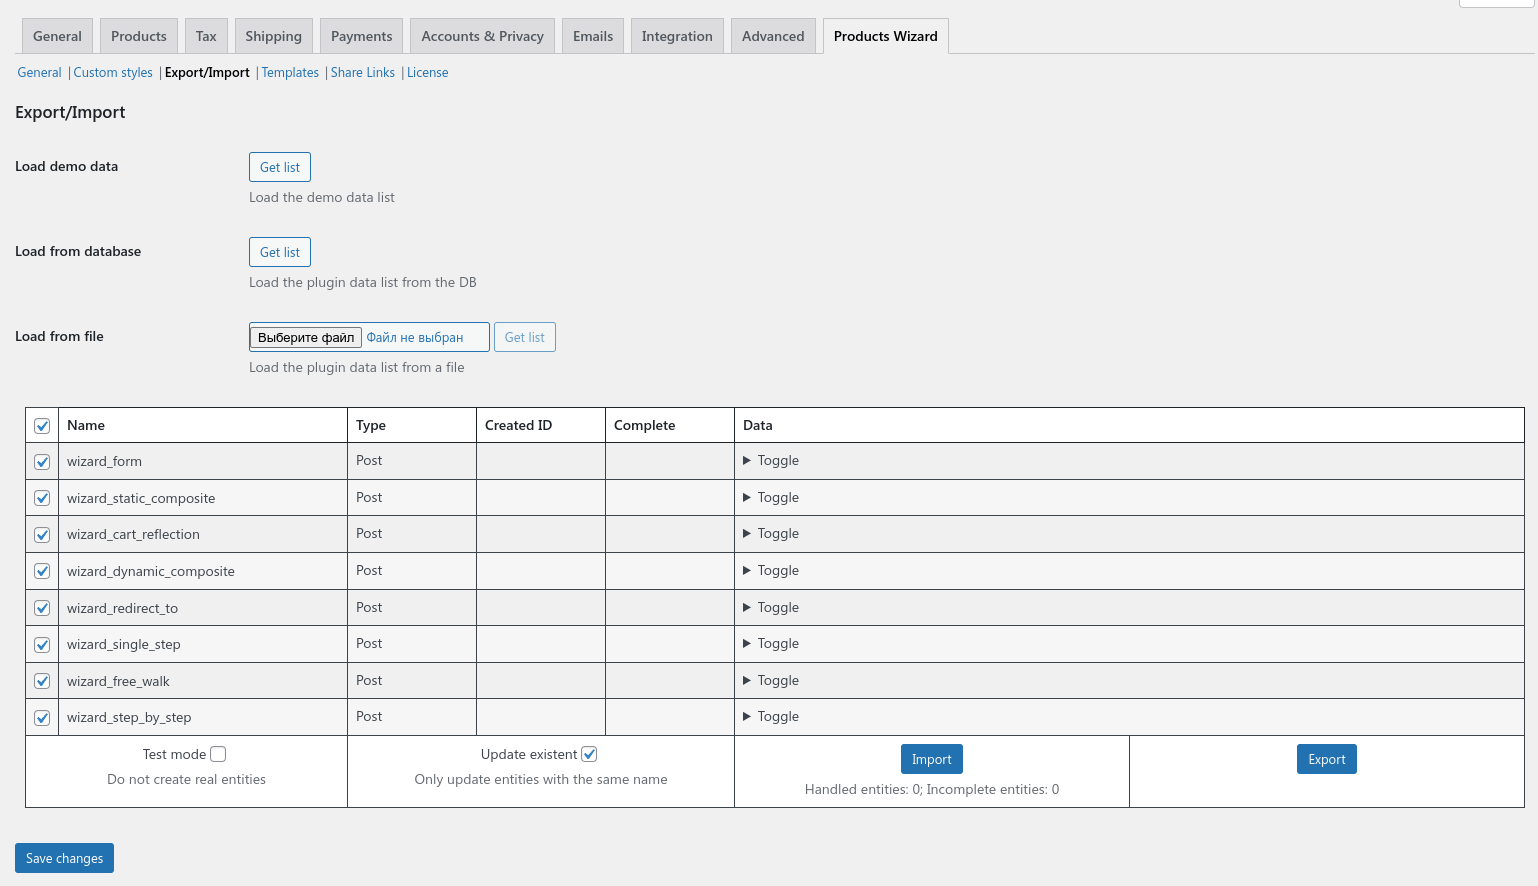
Export/Import
The first acquaintance with the plugin might be complicated due to the lot of settings available. To make this process easier feel free to use the demo-data generator stuff.
To get the demo-data list click the Get list near the Load demo data setting. The list of entities to create will appear the table lower. This table output all entities names, types, status, and full data dump. This is possible to select only specific entities to be created, but remember some of them depends on each other, so if disable some of the entities, other might be created particularly.
You can try the generation process using the Test mode launch. You will see each entity status individually in a special column. In case the entity isn't complete, you can find some red NULL strings in the entity data dump column. It'll help you to see what data isn't created.
With the Update existent setting on the plugin will try to update the same labeled entities first, and only then create a new one.
The number of created and incomplete entities will be shown under the Import button.
That's also possible to migrate all created plugin data from one site to another. Use the export file from the source site on the target site.
The file will be parsed and in case of success the table of parsed entities will appear lower. You can also try the generation process using the Test mode launch to be sure the data can be created fully. In case of problems you'll see the incomplete status of some entities.
All of the image attachments will be downloaded from the remote host and uploaded into your media library, so be sure the remote host is available at the moment of import.
Remember the script downloads and uploads only images that are defined in the settings. Images from the content part will not be replaced. You'll need to download them manually. There is the Cope-Paste Helper plugin making this process must easier. It can download external images and replace them in the post content via one click.
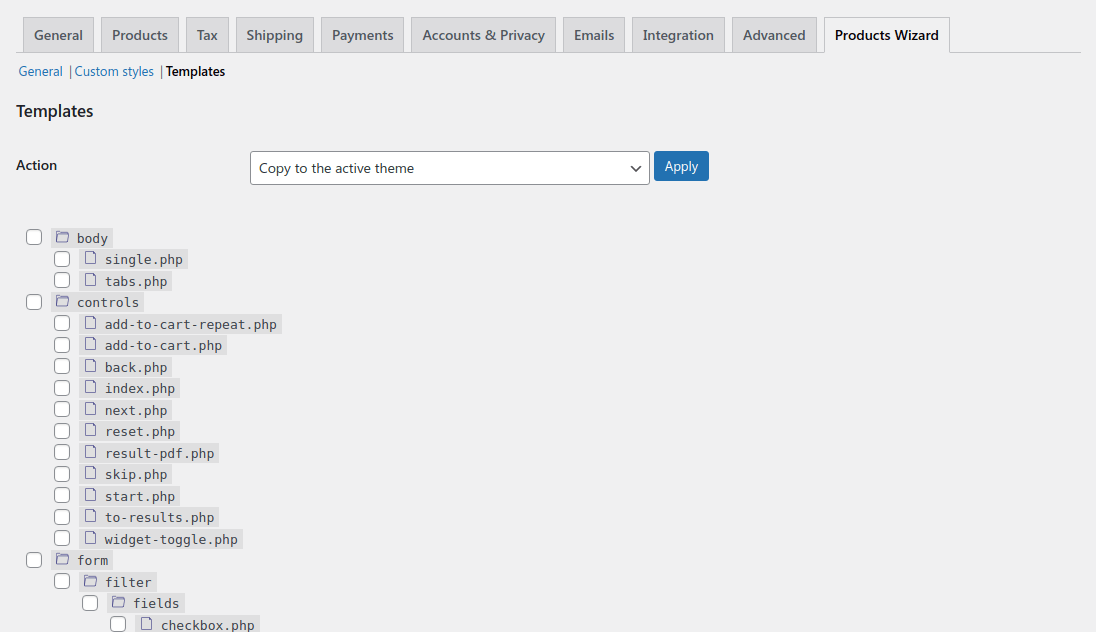
Templates Customization
WooCommerce Products Wizard plugin has a folder of views that are used to be shown on the front of the site. There is a possibility to customize them as you need and keep the changes while the plugin updates.
To do this select files that require customization in the views list and apply the «Copy to the active theme» action in the form above. Selected views will be copied into your active theme in the woocommerce-products-wizard folder saving the sub-folders structure. Files copied to your active theme will be marked by a tick icon.
The plugin firstly searches for a specific view in the theme's folders, and if it doesn't find the view there, it gets the view from its own directory.
You can edit the copied views using the «Appearance - Them editor» page.
If you want to delete some views from your active theme choose them in the views list, select the appropriate point in the form dropdown above and apply the changes. The view will be removed from the theme and the plugin's view will be used instead.
Keep in mind plugin might have some changes in the view files while updating. So if you have customized ones some of the new features will not work or might work wrong with them. This way just copy them from the plugin and adjust to your needs once again.
Share Links
If you have the «Share button type» equal to Short link with data stored in DB you'll find all created share links on that page.
Select a wizard, define a dates of creation range if necessary, and change the links per page setting.
The lower table row indicates one share link and its data: ID, short DB link, full link, when it's created, last time the link clicked, and the number of clicks
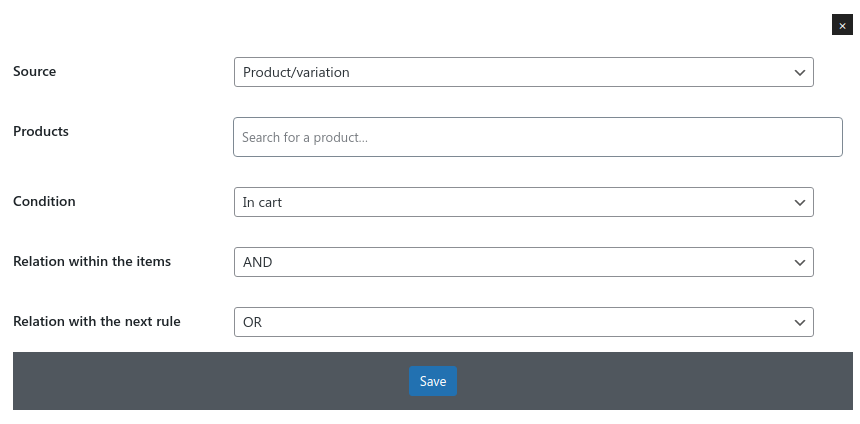
Availability rules
«Availability rules» is a complex setting to control conditional logic for any wizard entity appearance depending on the current user selection. The number of rule rows is unlimited.
Each rule can have a source:
«Products/variations» in or not in the cart;
«Products selected number» - products selected number despite their individual quantity;
«Products meta number» - meta value of the selected products;
«Products quantity» - products selected number including their individual quantity;
«Products price»;
«Products categories» in or not in the cart;
«Products attributes» in or not in the cart;
«Products attribute number» - numeric attribute value of the selected products;
«Step input value» - allows to use a [wcpw-step-input] shortcode's value given by the customer;
«Custom value» - custom value or shortcode.
All Product-based values also have the «Steps» setting to check specific steps only. It gets the steps IDs separated by a comma.
Products/variations/categories/attributes values:
Can have only In cart/Not in cart condition;
Have «Relation within the items» setting. It has «ALL» value to make all items be met, and «OR» to make any item to be met;
Other Product-based values can have condition: Equal, Not equal, Less, Less or equal, More, More or equal.
While as Step input value and Custom value supports all these conditions.
Meta number, products quantity, and products price values have the «Function» setting:
«Sum» - total value of all found values;
«Least» - the smallest of the found values;
«Greatest» - the biggest of the found values.
The «Target» setting can be:
«Custom value» - custom value or shortcode;
«Products selected number» - products selected number despite their individual quantity;
«Products meta number» - meta value of the selected products;
«Products quantity» - products selected number including their individual quantity;
«Products price»;
«Products attribute number» - numeric attribute value of the selected products;
«Step input value» - allows to use a [wcpw-step-input] shortcode's value given by the customer.
All other additional settings of «Target» are the same as for the «Source».
«Products meta value», «Product attribute number», and «Products price» values of «Source» and «Target» have an «Include quantity» checkbox to multiply the found value by a product quantity.
You can set the «Relationship with the next rule» option to create chains of conditions. If you set the «OR» value then the rule will work independently of the next rule, while the «AND» value creates a chain of conditions of the current rule and the next one. That's possible to create chains of more than two rules.
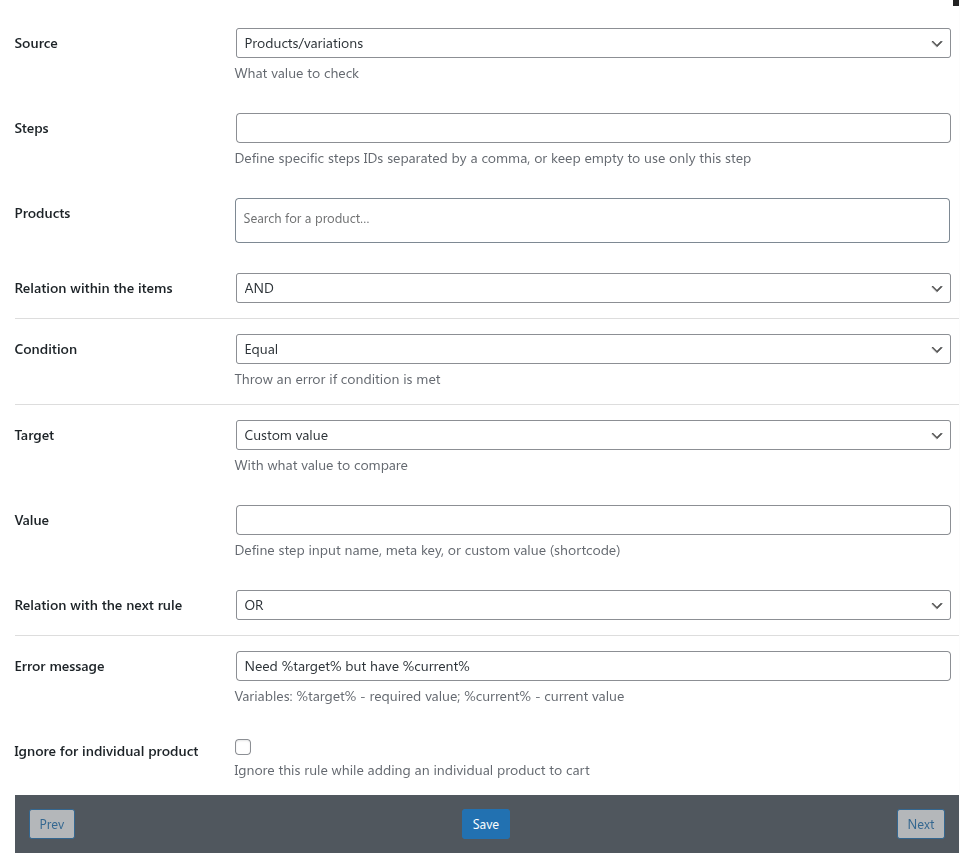
While «Availability rules» shows or hides item of the wizard, «Cart rules» throws an error if condition is met.
Because of this there is a couple of addition settings.
The «Error message» setting is made to notice what exactly rule is met.
Wizard step also have the «Ignore for individual product» setting. It can be helpful to use with the individual add-to-cart controls of the products.
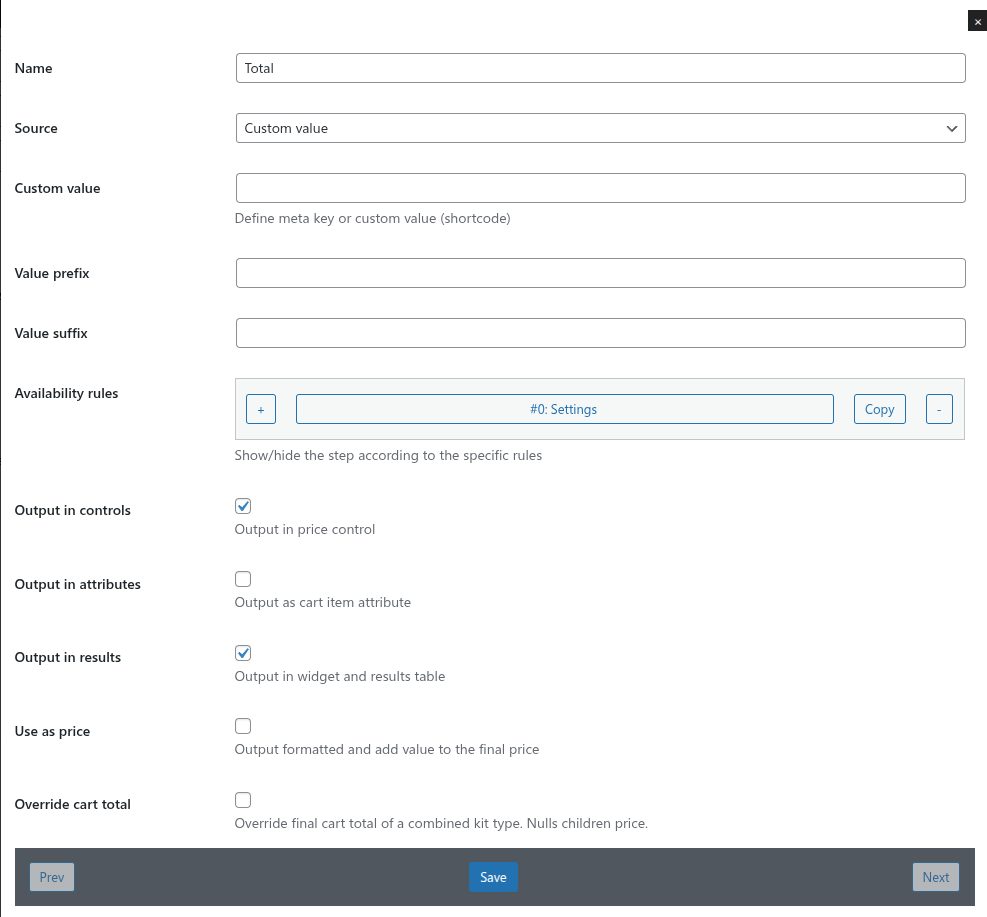
Total rows
«Total rows» setting allows to output any result name + value pairs of a wizard or step.
«Name» setting sets the name of the row to output.
«Source» setting defines what value should be used for output. The possible values are:
«Products selected» - number of products selected despite their quantities of specific or all steps of the wizard;
«Product attribute» - allows to output a numeric attribute value of the selected products;
«Products meta» - allows to output a numeric meta value of the selected products;
«Products quantity» - number of products selected including their quantities of specific or all steps of the wizard;
«Products price» - total price of products selected of specific or all steps of the wizard;
«Custom value» - custom value or shortcode;
«Total price» - final amount of the selected items;
«Master product price» - current price of the product with an attached wizard. See product settings.
Meta number, products quantity, product attribute, and products price values have the «Function» setting:
«Sum» - total value of all found values;
«Least» - the smallest of the found values;
«Greatest» - the biggest of the found values.
Each value can has prefix and suffix if necessary.
«Availability rules» is a unified setting to control item appearance. See description.
«Custom value» source can be used as price and will be added into the final price.
Also, «Custom value» source allows to override cart total value by this custom value. That could be helpful if you want to create a fixed-price kit. See description.
The «Output in controls» setting allows to output the value within the «Price» control element. See description.
The «Output in attributes» setting allows to output the value as a WooCommerce cart root product attribute.
The «Output in results» setting allows to output the row within widget and results table.
Button controls
The main feature of all control buttons is they may have different classes for their styling and behavior. As the main stylesheet of this plugin is based on the Bootstrap 5 framework you can use any of the
available styling classes for Buttons and
display utility classes.
Also, there are a few classes that control the buttons' text and icons' appearance:
hide-text - hides text of the button but keeps it for screen readers;
hide-text-on-mobile - hides text of the button on small screens but keeps it for screen readers;
icon-start - define on which side of the button the icon should appear;
icon-end - define on which side of the button the icon should appear;
show-icon - always shows a pre-defined button icon. Requires icon-start/end class for work;
show-icon-on-mobile - shows a pre-defined button icon on small screens. Requires icon-start/end
class for work;
Shortcodes
What shortcodes are available for using in the plugin:
[woocommerce-products-wizard] - the main shortcode to output the wizard section. Requires the id attribute;
[wcpw-result-pdf-page-number] - outputs a current page number of the results PDF file;
[wcpw-result-pdf-page-total] - outputs total pages number of the results PDF file;
[wcpw-result-pdf-new-page] - outputs a new page in the results PDF file;
[wcpw-step-input] - special shortcode to output a custom step input field. Get more info from the step settings section;
[wcpw-cart-total-price] - shortcode to output the current wizard total price HTML;
[wcpw-share-url-query] - shortcode to get the current wizard state share URL query part (without domain and page link - only the GET part).
[wcpw-db-share-url] - shortcode to get the current wizard state short share link stored in the database.
[wcpw-product-price] - special shortcode to output individual product price within product cart controls.
FAQ
(frequently asked questions)
The wizard doesn't want to move further through the steps
Some server configurations might have problems with the current session storing. Mostly the «Store session in the DB» setting fixes this problem.
The wizard looks work but returns a static or random output.
Much probably you’re using a caching plugin on your site which makes page content freeze and the wizard output also. In this case, tick the «Send current state hash via AJAX» global setting to change the page URL for each wizard’s state. Mostly, that will help to solve the problem.
I want to collect custom data from users (text or file)
There are two ways to achieve this. Both of them have their own pros and cons.
This is possible to do. Select a ContactForm7 for use on the results step of the wizard. The email will have an attached PDF file of the user selection.
Sometimes you need to get some custom data by your customers, e.g. custom text, number, file, and so on. There are a couple of different ways to achieve this.
Extra Product Options plugin
The use of the Extra Product Options plugin which is compatible with Woocommerce Products Wizard plugin. This plugin lets you add custom fields to any product. To make it work with Woocommerce Products Wizard plugin it is necessary to set the following settings:
The General - Initialization - Plugin Loading Areas to "Everywhere";
The General - Various - Enable plugin for WooCommerce shortcodes to "on";
The Global - Product page - Reset option values after the product is added to the cart to "off".
Step Custom Fields
The second way is to add custom fields to the steps implemented by the Woocommerce Products Wizard plugin. You can add them, for example, into the step description setting field.
[wcpw-step-input name="My custom filed"] - the shortcode to output the input tag. Keep in mind the shortcode outputs only INPUT/TEXTAREA/SELECT elements, so you need to add a <label> tag near or around the input yourself.
The name attribute is required for correct work of the shortcode.
The type attribute indicates the input type value. That could be any of the
available input types, except of: "button", "image", "reset", "submit".
Out of the available HTML input types you can set the type attribute to textarea to output a big text input field, and select to output a native select/dropdown element.
For the select tag type use the values attribute to list the options, delimited by a "|" symbol. An example:
<label>
    Select a value
    [wcpw-step-input name="My dropdown" type="select" values="One|Two|Three|Four" value="Two"]
</label>
You can also pass any other attributes you need the same way. All of them will be passed into an input tag. That could be a key="value" pair or a singular attribute.
Here is an example of checkbox input:
<label>
    [wcpw-step-input name="My checkbox" type="checkbox" value="Yes" checked]
    My checkbox
</label>
Using of the array input name
Some of the input types allows to pass a few values per one name. For example, checkbox input type, file input type and select tag allows to pass a few values using [] brackets in the name attribute.
To not broke the shortcode structure use the {} brackets instead of the square ones. Examples:
These custom fields data will be presented in the PDF file created by the wizard. But to keep them for the WooCommerce cart items enable creating of the combined product kits.
If you want to use custom fields as filters for your products then you need to use two hooks. The first one is used to add filter instances. They are arrays with keys within, namely:
label - Filter's name, as a label in the front part;
key - Inner key;
view - A filter view name. The view can be supported by a wizard by default, or can be a custom one;
value - Current value of the field (like text input). This can be null as well;
values - Array of the possible values of the filter.
The second hook is to handle the values that passed as WP_Query arguments.
Here is an example of using YITH brands taxonomy as a product filter within the #123 wizard for the 1rst and 2nd step:
<?php
// add custom filters to output on the front part
add_filter('wcpw_filter_fields', function ($output, $wizardId, $stepId, $appliedFilters) {
    // add only for specific wizard ID and steps IDs
    if ($wizardId == 123 && in_array($stepId, [1, 2])) {
        $label = 'Brands'; // filter name
        $view = 'checkbox'; // required view
        $key = 'yith_product_brand'; // taxonomy to use
        $values = [];

        // collect terms as values
        $terms = get_terms(['taxonomy' => $key]);

        foreach ($terms as $term) {
            $values[] = [
                'id' => $term->term_id,
                'name' => $term->name,
                'isActive' => isset($appliedFilters[$key]) && in_array($term->term_id, $appliedFilters[$key])
            ];
        }

        $output[] = [
            'label' => $label,
            'key' => $key,
            'view' => $view,
            'value' => isset($appliedFilters[$key]) ? $appliedFilters[$key] : null,
            'values' => $values
        ];
    }

    if ($wizardId == 321 && in_array($stepId, [4, 5])) {
        // other filters here...
    }

    return $output;
}, 10, 4);

// handle passed filters to query args
add_filter('wcpw_filter_args_to_query', function ($output, $filters) {
    foreach ($filters as $filter) {
        foreach ($filter as $key => $value) {
            // add query arg by the custom taxonomy
            if ($key == 'yith_product_brand' && !empty(array_filter($value)) {
                $output['tax_query'][] = [
                    'taxonomy' => $key,
                    'field' => 'id',
                    'terms' => array_filter($value),
                    'operator' => 'IN'
                ];
            }

            // other filters here...
        }
    }

    return $output;
}, 10, 2);
?>
If you need to make some products available only in the Woocommerce Products Wizard wizards, the code below can help you. This code adds an extra checkbox on the "Inventory" product tab. If this checkbox is ticked then this product will be hidden from the e-shop. Add this extra code to the functions.php file of your theme.
<?php
// add extra field
add_action('woocommerce_product_options_stock_status', function () {
    woocommerce_wp_checkbox(array(
        'id' => '_is_hidden_product',
        'wrapper_class' => 'show_if_simple show_if_variable',
        'label' => 'Hide Product From Shop'
    ));
});

// save post
add_action('woocommerce_admin_process_product_object', function ($product) {
    if (isset($_POST['_is_hidden_product'])) {
        $product->update_meta_data('_is_hidden_product', 'yes');
    } else {
        $product->delete_meta_data('_is_hidden_product');
    }
});

// modify the query
add_action('woocommerce_product_query', function ($query) {
    $meta_query = $query->get('meta_query');
    $meta_query[] = array('key' => '_is_hidden_product', 'compare' => 'NOT EXISTS');
    $query->set('meta_query', $meta_query);
});

add_action('woocommerce_shortcode_products_query', function ($query) {
    $query['meta_query'][] = array('key' => '_is_hidden_product', 'compare' => 'NOT EXISTS');

    return $query;
});

// disable cart table permalink
add_filter('woocommerce_cart_item_permalink', function ($permalink, $cartItem) {
    if (filter_var(get_post_meta($cartItem['product_id'], '_is_hidden_product', true), FILTER_VALIDATE_BOOLEAN)) {
        return false;
    }

    return $permalink;
}, 20, 2);

// disable order details table permalink
add_action('woocommerce_order_item_permalink', function ($permalink, $cartItem) {
    if (!$cartItem instanceof \WC_Order_Item_Product) {
        return $permalink;
    }

    $product = $cartItem->get_product();

    if (!$product) {
        return $permalink;
    }

    if (filter_var(get_post_meta($cartItem['product_id'], '_is_hidden_product', true), FILTER_VALIDATE_BOOLEAN)) {
        return false;
    }

    return $permalink;
}, 10, 2);
?>
Link Don't apply coupons to products with a wizard discount
If the products that are fetched from your wizard already have a discount, and you don't want coupons reduce their price further, add this extra code to the functions.php file of your theme.
Link Apply a dynamic discount according to the selected products number
The next code makes the «Price discount» setting dynamic according to the current selected products numbers in the wizard. Use the $rules variable to define the products number and its discount value as 4 => 10, namely 4 or more products have 10% discount until the next met rule.
<?php
// dynamic discount value by the current cart count
add_filter('wcpw_post_setting', function ($value, $id, $setting) {
    if ($setting != 'price_discount' || (is_admin() && !wp_doing_ajax())) {
        return $value;
    }

    $cart = \WCProductsWizard\Cart::get($id);
    $cartCount = 0;
    $rules = [
        1 => 0,
        4 => 10,
        10 => 20,
        50 => 25
    ];

    foreach ($cart as $item) {
        if (!isset($item['quantity']) || !$item['quantity']) {
            continue;
        }

        $cartCount += $item['quantity'];
    }

    if ($cartCount) {
        foreach ($rules as $count => $discount) {
            if ($cartCount >= $count) {
                $value = $discount;
            } else {
                break;
            }
        }
    }

    return $value;
}, 10, 3);
?>
Link Apply a dynamic discount according to cart total
The next code makes the «Price discount» setting dynamic according to the current selected products numbers in the wizard. Use the $rules variable to define the cart total and its discount value as 200 => 10, namely 200 or more total have 10% discount until the next met rule.
If you need to show disabled or out of stock products in your wizard add the lower code to your site and comment/uncomment conditions to be checked.
<?php
add_filter('wcpw_product_availability', function ($available, $productId, $wizardId) {
    switch (get_post_type($productId)) {
        default:
        case 'product':
            $product = new \WC_Product((int) $productId);
            break;

        case 'product_variation':
            $product = new \WC_Product_Variation((int) $productId);
    }

    $availabilityRules = \WCProductsWizard\Product::getSetting((int) $productId, 'availability_rules');
    $available = (
        \WCProductsWizard\Utils::getAvailabilityByRules($wizardId, $availabilityRules, "product-{$productId}") # check wizard's availability settings
        // && $product->is_visible() # is visible in the catalog
        // && (!filter_var(get_option('woocommerce_hide_out_of_stock_items'), FILTER_VALIDATE_BOOLEAN) || $product->is_in_stock() || $product->backorders_allowed()) # if out of stock products are visible or is in stock or backordered
        // && $product->is_purchasable() # can be bought or not
    );

    return $available;
}, 10, 3);
?>
JS Snippets
JS Actions
Plugin is made using vanilla JavaScript, but it's also jQuery-compatible if necessary.
Here is the list of some Javascript codes to change the wizard's behavior. There are many ways to add them to your site. You can use some plugins to add extra scripts, for example
Simple Custom CSS and JS.
Also, some themes provides text fields for custom codes for using. Or you can add extra scripts right in theme's javascript files, but it's better to do only for the child themes because you can lose the changes you made while theme update.
// submit wizard on any product variation property change
jQuery(document).on('change', '[data-component~="wcpw-product-variations-item-input"]', function () {
    jQuery(this).closest('[data-component~="wcpw"]').data('wcpw').submit();
});

// add product to cart and go next once click on it
jQuery(document).on('click', '[data-component~="wcpw-product"]', function () {
    var $product = jQuery(this);
    var $wcpw = $product.closest('[data-component~="wcpw"]');

    $wcpw.data('wcpw').addCartProduct(
        {productToAddKey: $product.data('step-id') + '-' + $product.data('id')},
        {behavior: 'submit'}
    );
});

// tick the product checkbox while changing a variation property
jQuery(document).on('change', '[data-component~="wcpw-product-variations-item-input"]', function () {
    jQuery(this).closest('[data-component~="wcpw-product"]').find('[data-component~="wcpw-product-choose"][type="checkbox"]').prop('checked', true);
});

// don't open the image page on thumbnail click
jQuery(document).on('click', '[data-component~="wcpw-product-thumbnail-link"]', function (event) {event.preventDefault()});

// XStore theme product quantity buttons fix
jQuery(document).on('ajaxCompleted.wcpw', function (event, instance) {
    instance.$element.find('[data-component~="wcpw-product-quantity-input"]')
        .before('<span value="-" class="minus"><i class="et-icon et-minus"></i></span>')
        .after('<span value="+" class="plus"><i class="et-icon et-plus"></i></span>');
});